This is an update on two projects I am currently working on. Actually, the lace shrug is done, but the spiderweb vest will take a lot more time. I am having a ton of fun doing it, though, and even my husband was impressed enough yesterday to remark on how how much he liked it. It has been raining for two days, so in between house and barn chores, I have had lots of time to work on this, and it has been a great way to use up bead odds and ends left over from other projects. Still looking for the perfect spider to put in the middle when the web is finished, but I know I'll find one eventually.
So far I have used pearls and beads of various colors and sizes. What is hard to see in my photos (again, taken indoors on a dark and rainy day — and yeah, I need a way to fix that problem, I know), is that I have started sewing tiny, sparkly white rocailles in the spokes of the web, and on some of the ladder threads. I tried very hard to get them to show up in my spotlight, but wasn't very successful. The web is made of embroidery thread — two strands doubled for the thickest spokes, two strands single for the next size down, and regular quilting thread, doubled, for the finest. At this point, it is all done in backstitch. Even the beads are sewn in with backstitch.
I have lots more work to do on this, and lots more beads and things I want to add, so it looks like leaves and maybe flower petals have gotten caught in the web. I am also going to add bugs tangled in it. Like I said, I am having a lot of fun with this vest, and keeping a sense of humor over the design. I am also getting a lot of listening in on my collection of books-on-tape and CDs. Mostly classic murder mysteries by Ngiao Marsh, Georgette Heyer, Ellis Peters, and Elizabeth Peters with a bit of James Lee Burke thrown in for atmosphere. Love his books.
These last two photos are of the fine line of beading I did around the edge of the lace shrug I dyed with avocado dye. It is really hard to see, and is only a single line of beading, but it adds just a bit of weight, and sparkle when the light hits it just right. This project is done, as the lace is old and fairly fragile, and wouldn't take the weight of adding beads to the body of the piece. But I liked the way it turned out, and enjoyed the dying process with the avocado skins, so will try that again on something sturdier.
The line of beads ( in case you really can't find it) is where the lace trim and the old lace tablecloth meet. Two purple beads to one rose pink bead sewn on with doubled quilting thread. In these photos the shrug looks almost peach colored, but in real life is a soft, antique rose pink.
That's the latest....hope you all are having a lovely Spring.
"To live in the world without becoming aware of the meaning of the world is like wandering about in a great library without touching the books.".....The Secret Teachings of All Ages
"Neither aesthetics nor money-spent make a good studio-it's what you make inside it that really counts"...Shanna Van Maurice, artist.
Wednesday, March 26, 2014
Wednesday, March 19, 2014
Drunken Spider Vest
This is the start of a pretty major embroidery and beading project, based on a photo I saw on Pinterest. Someone created a huge spiderweb strung with pearls and crystals. My first thought was, it would look awesome on the back of a jacket or vest. I had a denim jacket, but alas, it was stretch denim and wouldn't work for this project. Back to the Goodwill. Luckily, I found this cute little short-sleeved number for only $5.99.
I hated the funky roll-up sleeves.
I didn't really want a collar on it either. It was also a bit tight across the back, so...off with the sleeves and collar. Then I took out my handy bar of soap and marked the spiderweb lines on the back. This spider isn't too particular about how her web looks, mainly because I wanted the design to be pretty free-form. Not sure just how a spider would get drunk...unless it had snacked on one too many flies that had been drinking out of someone's beer mug, but oh well.
The web design will get more complicated and crazier as I go. These lines are the foundation. I am going to find a plastic spider or maybe a spider pin to put in the center of the web, and then add a few plastic bugs as well. I might even wrap some in floss so they look like spider snack food hanging in the pantry.
Ooo, or I could even find a little picture of Vincent Price and sew him into the web, with a word bubble over his head saying "Help me, help me!" LOL
So, there is the start of the Drunken Spider Vest project. This one should be a lot of fun.
I hated the funky roll-up sleeves.
I didn't really want a collar on it either. It was also a bit tight across the back, so...off with the sleeves and collar. Then I took out my handy bar of soap and marked the spiderweb lines on the back. This spider isn't too particular about how her web looks, mainly because I wanted the design to be pretty free-form. Not sure just how a spider would get drunk...unless it had snacked on one too many flies that had been drinking out of someone's beer mug, but oh well.
The web design will get more complicated and crazier as I go. These lines are the foundation. I am going to find a plastic spider or maybe a spider pin to put in the center of the web, and then add a few plastic bugs as well. I might even wrap some in floss so they look like spider snack food hanging in the pantry.
Ooo, or I could even find a little picture of Vincent Price and sew him into the web, with a word bubble over his head saying "Help me, help me!" LOL
So, there is the start of the Drunken Spider Vest project. This one should be a lot of fun.
Tuesday, March 18, 2014
Spring Flip-Flops
I bet you thought I meant those funny, must have flip-flops that I personally love, and live in all summer. Nope. This is how I grudgingly deal with bi-polar Spring weather.
As Mother Nature flip-flops between Winter and Spring—one day it's dark, pouring rain and only 44 degrees, the next it's bright, sunny and 72 degrees—my schedule flip-flops in tandem with Hers.
When it's nice, I'm outside working in the yard and garden, clearing out all the dead winter wood and brush. That's when I discover just how many gophers have taken up residence since last summer. In this year's case there are so many holes it looks like someone did several strafing runs over my garden firing 27 mm rounds. I also had to take an inventory of how many plants I lost due to the mini ice age we had back in December. So far it looks like the succulents on the front walkway suffered the most attrition, and I may have lost the star jasmine in the big pot by the terrace steps, but the verdict is still out on that one. Robert and I also decided to eliminate the whole back side of the fenced garden, as it is slowing collapsing into the creek, and it would be way too expensive and labor intensive to shore it back up. Since that section also is in the shade most of the day, then in the afternoon is subjected to direct sunlight and intense heat during the summer, it's a pain in the butt to find something that can grow in those two extremes. The last thing I attempted was hydrangeas, and they have struggled. I may pot them up and put them in the shade on the deck. When I attempted to grow them anywhere else in the yard, the deer ate them to a nub. Yes, anything planted outside the fenced garden has to be deer proof.
The other thing I do when the weather is nice is work my horses. We just got a new one for my husband, who had to retire his old gelding, Apollo, who is now around 25 and looking his age. He just didn't have the stamina for the kinds of horse activities we do. The fact that the vet told us he has arthritis in all four legs, but especially in the hind, just sealed his retirement fate. So, now we have Strider, a seven-and-a-half-year-old Fox Trotter, who needs a lot of work, since his previous owner didn't ride him much. And just last Sunday we learned that he doesn't like going into a trailer. He loaded fine at his previous home, with his first mom leading him in. When we tried at our place he balked, pulled back and broke the tie-in, and we spent two hours working with him to finally get him back in and to stand quietly, then back out nicely. It's going to take many more sessions like that before we go anywhere, since I won't travel with a horse who won't load and unload easily.
Here is a photo of Robert on one of his first rides on Strider. My mare, Delight, is giving Strider the stink-eye as they go by. I think Delight is still secretly hoping Strider will go back where he came from, and she and Apollo can have their privacy back.
With the weather flipping back and forth, the biggest issue we have with working the horses is the bad footing. We have forest clay soil, and despite the varied ways we have tried to augment the ground to make it more workable, it eventually gets too slippery and sloggy to do anything faster than a walk. That's where things are now, which is pretty danged frustrating when the sun is shining and you really want to get some riding work in, and the most you can do is putz around. Not that there aren't a lot of things you can teach or perfect at the walk, but it does get tiresome after about a month. But I battle on, do what I can, and grit my teeth every time it rains and makes the ground even more slippery.
On days where it's dark and rainy, I work on projects inside, or, as I did the other morning, I go into town. Sometimes to run errands and visit the library to replenish my stash, or in this case, I trolled the Goodwill then went next door to JoAnn's Fabrics. It turned out to be fortuitous timing, since I found a few nice things at the Goodwill, and JoAnn's had all their jewelry supplies on sale for 40-75 percent off. I came home with two T-shirts to make another bolero, and a denim short-sleeved jacket for another project I have in mind, which I will go into more on my next post.
Here is a very dark photo (remember, I said it was a gloomy, rainy day) showing the treasures I came home with, all piled on the coffee table in the living room, which at the time was the brightest place in the house. I bought the patterned shirt because the color and leaf design reminded me of William Morris wallpaper. It was the first piece I found, and I figured the chances of finding a color to match it would be slim to zero, so I went poking around looking for a good contrasting color when I found the other T-shirt, which matched the color of the patterned one exactly. That was a lucky find, indeed.
This lovely little hoard of goodies, shirts and findings, cost me under $20. The only thing I didn't think to get (my mind was in jewelry nirvana at all the things on sale) was some embroidery floss to match the dark green in the patterned shirt, since the binding on the bolero will be out of the solid aqua.
Oh gosh darn, I will have to go back to JoAnn's again. Life can be such a trial.
As Mother Nature flip-flops between Winter and Spring—one day it's dark, pouring rain and only 44 degrees, the next it's bright, sunny and 72 degrees—my schedule flip-flops in tandem with Hers.
When it's nice, I'm outside working in the yard and garden, clearing out all the dead winter wood and brush. That's when I discover just how many gophers have taken up residence since last summer. In this year's case there are so many holes it looks like someone did several strafing runs over my garden firing 27 mm rounds. I also had to take an inventory of how many plants I lost due to the mini ice age we had back in December. So far it looks like the succulents on the front walkway suffered the most attrition, and I may have lost the star jasmine in the big pot by the terrace steps, but the verdict is still out on that one. Robert and I also decided to eliminate the whole back side of the fenced garden, as it is slowing collapsing into the creek, and it would be way too expensive and labor intensive to shore it back up. Since that section also is in the shade most of the day, then in the afternoon is subjected to direct sunlight and intense heat during the summer, it's a pain in the butt to find something that can grow in those two extremes. The last thing I attempted was hydrangeas, and they have struggled. I may pot them up and put them in the shade on the deck. When I attempted to grow them anywhere else in the yard, the deer ate them to a nub. Yes, anything planted outside the fenced garden has to be deer proof.
The other thing I do when the weather is nice is work my horses. We just got a new one for my husband, who had to retire his old gelding, Apollo, who is now around 25 and looking his age. He just didn't have the stamina for the kinds of horse activities we do. The fact that the vet told us he has arthritis in all four legs, but especially in the hind, just sealed his retirement fate. So, now we have Strider, a seven-and-a-half-year-old Fox Trotter, who needs a lot of work, since his previous owner didn't ride him much. And just last Sunday we learned that he doesn't like going into a trailer. He loaded fine at his previous home, with his first mom leading him in. When we tried at our place he balked, pulled back and broke the tie-in, and we spent two hours working with him to finally get him back in and to stand quietly, then back out nicely. It's going to take many more sessions like that before we go anywhere, since I won't travel with a horse who won't load and unload easily.
Here is a photo of Robert on one of his first rides on Strider. My mare, Delight, is giving Strider the stink-eye as they go by. I think Delight is still secretly hoping Strider will go back where he came from, and she and Apollo can have their privacy back.
With the weather flipping back and forth, the biggest issue we have with working the horses is the bad footing. We have forest clay soil, and despite the varied ways we have tried to augment the ground to make it more workable, it eventually gets too slippery and sloggy to do anything faster than a walk. That's where things are now, which is pretty danged frustrating when the sun is shining and you really want to get some riding work in, and the most you can do is putz around. Not that there aren't a lot of things you can teach or perfect at the walk, but it does get tiresome after about a month. But I battle on, do what I can, and grit my teeth every time it rains and makes the ground even more slippery.
On days where it's dark and rainy, I work on projects inside, or, as I did the other morning, I go into town. Sometimes to run errands and visit the library to replenish my stash, or in this case, I trolled the Goodwill then went next door to JoAnn's Fabrics. It turned out to be fortuitous timing, since I found a few nice things at the Goodwill, and JoAnn's had all their jewelry supplies on sale for 40-75 percent off. I came home with two T-shirts to make another bolero, and a denim short-sleeved jacket for another project I have in mind, which I will go into more on my next post.
Here is a very dark photo (remember, I said it was a gloomy, rainy day) showing the treasures I came home with, all piled on the coffee table in the living room, which at the time was the brightest place in the house. I bought the patterned shirt because the color and leaf design reminded me of William Morris wallpaper. It was the first piece I found, and I figured the chances of finding a color to match it would be slim to zero, so I went poking around looking for a good contrasting color when I found the other T-shirt, which matched the color of the patterned one exactly. That was a lucky find, indeed.
This lovely little hoard of goodies, shirts and findings, cost me under $20. The only thing I didn't think to get (my mind was in jewelry nirvana at all the things on sale) was some embroidery floss to match the dark green in the patterned shirt, since the binding on the bolero will be out of the solid aqua.
Oh gosh darn, I will have to go back to JoAnn's again. Life can be such a trial.
Monday, February 24, 2014
Avocado Skin Dye, Bleach Pens, and Hair Ornaments
February has been a month for new things. New techniques, new experiments, and even a new horse for my husband. The fun of all this is what finally sailed me out of the creative doldrums which had parked me dead-in-the-water for months. Here are just a few of the things I have been playing around with.
Avocado skin dye.
I saw a photo, probably on Pinterest, of a garment dyed with avocado skins. I loved the beautiful dusky rose color the dye created. Since Robert and I both love avocados, and I knew I could collect a nice stash of skins, I decided to give it a try. First I did a google search for "Dyeing cloth with avocado skins" since I had no clue how you actually created the dye. Turns out it is easy-peasy. You put the skin of one or two avocados (I used two) in about a gallon of water (I just filled a canning kettle half full), simmer the skins for 20 minutes, remove the skins and put in the cloth you intend to dye, and simmer that for another 20 minutes. I only had a small lace shrug and a tea towel I was dyeing, so didn't need a big batch of dye. For bigger garments or fabric yardage, you might want to use more water and skins, as the pieces need to be loose enough so that you can stir them a bit as they simmer.
Here is the shrug and the tea cloth simmering away in the dye.
After they had simmered, I filled the sink with cold water, pulled the shrug and tea cloth out with a pair of tongs, and dunked them in the cold water. When they were cool enough to handle, I lightly wrung them out then put them in the dryer. That was it.
Here are the shrug—one I made years ago out of an old tablecloth—and the tea cloth before I dyed them. The shrug had started to turn yellow with age. The tea cloth I dyed so I could cut it up and use on something else as maybe part of an applique.
Here are the two pieces after I dyed them. The lace on the shrug was a surprise, as I couldn't remember if it was cotton or a synthetic. Luckily, it was cotton and dyed beautifully. Even though I am not a pink lover, I have fallen in love with this soft rose, and will try dyeing more pieces, just to see what happens. That, and it gives me an excuse to eat more avocados.
This shows the lace trim a bit better. Now that the shrug has a new lease on life, I am thinking of adding some beading to it. We'll see, but it certainly looks better than it did before its dye job.
Now on to the next experiment...
Bleach pen drawing.
Bleach pens, available in the detergent section of grocery stores, are made for spot cleaning of stains on clothing, mildew on tiles, etc. You can also write or draw on cloth with them. The nozzles are not made for detailed work, and the flow of bleach can be kinda unpredictable, but I think with practice I could get fairly accurate with it. Pictured are my first attempt, done on denim scraps. I have to confess, I put the bleach on, set them out to let it work, and....accidentally forgot about them while I was working the avocado dye bath. I think the bleach got left on the denim for about an hour before I got around to washing it out. The piece to the left was the first try, and you can see I was just playing around with it. I got big blobs of bleach in some places, and skinny lines in others. I decided that simple designs would work best with this. The sample to the right is my second attempt, and worked better. I see using this technique on denim patches that could be stitched, embroidered, or beaded, then sewn to something else. I thought they would make nice decorative pockets.
I was also thinking of doing a bolero and making simple animal drawings on it with the bleach pen, like ancient cave pictographs. That might be fun.
On to project number three...
Hair ornaments.
I have always loved antique hair combs and pics. I spent WAY too long on Pinterest one day drooling over photos of beautiful antique and vintage hair ornaments, and it got me to thinking about making my own. I needed a new jewelry direction. The pieces I had posted on my Etsy site has stagnated and not sold. It kinda depressed me. So I temporarily closed the site, took all the old pieces apart, and started playing around with making hair ornaments out of hammered copper and aluminum wire, beads, and pieces of vintage jewelry—mostly broken brooches or clip earrings. It is a learning curve for me, since wire has a mind of its own and what I am trying to do with it can be frustrating. I especially have to learn patience with the thin wire I use almost like thread, to attach decorative pieces on the to pics. Many times I have had to just put the piece down and walk away from my work table. Otherwise the piece would probably end up flying out the front door. Of course I would then waste hours trying to find it again so I could finish it. But along with the frustration I am having fun, and got really fired up about making these hair ornaments. Once I get these up on my Etsy site, I am going to keep the prices as low as possible, postal costs considered, and see how they do.
Along with the hair ornaments, I decided to stick mainly to bracelets and earrings. For whatever reason, the necklaces never sold on Etsy, and rarely sold at the costume events I go to. I donated several to silent auctions and raffles, just to find them a home. I don't know whether it was because the necklaces cost more, or whether the designs weren't appealing, but in any case, it didn't seem worth it to keep making them if no one was interested. However, the earrings and bracelets and the one hair pic I made, all did pretty well.
So, here is an overview of some of the pieces I have made so far.
Next project is to make a light box so I can finally take decent photos of my pieces. That has been an on-going problem ever since I opened the Etsy site. No matter what I tried, I just couldn't get nice, clear, close up photos. The light box, easy to make from a heavy cardboard box (many examples found on Pinterest), will fix all that and make the site look more professional.
So that has been my month of February. How did yours go?
Avocado skin dye.
I saw a photo, probably on Pinterest, of a garment dyed with avocado skins. I loved the beautiful dusky rose color the dye created. Since Robert and I both love avocados, and I knew I could collect a nice stash of skins, I decided to give it a try. First I did a google search for "Dyeing cloth with avocado skins" since I had no clue how you actually created the dye. Turns out it is easy-peasy. You put the skin of one or two avocados (I used two) in about a gallon of water (I just filled a canning kettle half full), simmer the skins for 20 minutes, remove the skins and put in the cloth you intend to dye, and simmer that for another 20 minutes. I only had a small lace shrug and a tea towel I was dyeing, so didn't need a big batch of dye. For bigger garments or fabric yardage, you might want to use more water and skins, as the pieces need to be loose enough so that you can stir them a bit as they simmer.
Here is the shrug and the tea cloth simmering away in the dye.
After they had simmered, I filled the sink with cold water, pulled the shrug and tea cloth out with a pair of tongs, and dunked them in the cold water. When they were cool enough to handle, I lightly wrung them out then put them in the dryer. That was it.
Here are the shrug—one I made years ago out of an old tablecloth—and the tea cloth before I dyed them. The shrug had started to turn yellow with age. The tea cloth I dyed so I could cut it up and use on something else as maybe part of an applique.
Here are the two pieces after I dyed them. The lace on the shrug was a surprise, as I couldn't remember if it was cotton or a synthetic. Luckily, it was cotton and dyed beautifully. Even though I am not a pink lover, I have fallen in love with this soft rose, and will try dyeing more pieces, just to see what happens. That, and it gives me an excuse to eat more avocados.
This shows the lace trim a bit better. Now that the shrug has a new lease on life, I am thinking of adding some beading to it. We'll see, but it certainly looks better than it did before its dye job.
Now on to the next experiment...
Bleach pen drawing.
Bleach pens, available in the detergent section of grocery stores, are made for spot cleaning of stains on clothing, mildew on tiles, etc. You can also write or draw on cloth with them. The nozzles are not made for detailed work, and the flow of bleach can be kinda unpredictable, but I think with practice I could get fairly accurate with it. Pictured are my first attempt, done on denim scraps. I have to confess, I put the bleach on, set them out to let it work, and....accidentally forgot about them while I was working the avocado dye bath. I think the bleach got left on the denim for about an hour before I got around to washing it out. The piece to the left was the first try, and you can see I was just playing around with it. I got big blobs of bleach in some places, and skinny lines in others. I decided that simple designs would work best with this. The sample to the right is my second attempt, and worked better. I see using this technique on denim patches that could be stitched, embroidered, or beaded, then sewn to something else. I thought they would make nice decorative pockets.
I was also thinking of doing a bolero and making simple animal drawings on it with the bleach pen, like ancient cave pictographs. That might be fun.
On to project number three...
Hair ornaments.
I have always loved antique hair combs and pics. I spent WAY too long on Pinterest one day drooling over photos of beautiful antique and vintage hair ornaments, and it got me to thinking about making my own. I needed a new jewelry direction. The pieces I had posted on my Etsy site has stagnated and not sold. It kinda depressed me. So I temporarily closed the site, took all the old pieces apart, and started playing around with making hair ornaments out of hammered copper and aluminum wire, beads, and pieces of vintage jewelry—mostly broken brooches or clip earrings. It is a learning curve for me, since wire has a mind of its own and what I am trying to do with it can be frustrating. I especially have to learn patience with the thin wire I use almost like thread, to attach decorative pieces on the to pics. Many times I have had to just put the piece down and walk away from my work table. Otherwise the piece would probably end up flying out the front door. Of course I would then waste hours trying to find it again so I could finish it. But along with the frustration I am having fun, and got really fired up about making these hair ornaments. Once I get these up on my Etsy site, I am going to keep the prices as low as possible, postal costs considered, and see how they do.
Along with the hair ornaments, I decided to stick mainly to bracelets and earrings. For whatever reason, the necklaces never sold on Etsy, and rarely sold at the costume events I go to. I donated several to silent auctions and raffles, just to find them a home. I don't know whether it was because the necklaces cost more, or whether the designs weren't appealing, but in any case, it didn't seem worth it to keep making them if no one was interested. However, the earrings and bracelets and the one hair pic I made, all did pretty well.
So, here is an overview of some of the pieces I have made so far.
Next project is to make a light box so I can finally take decent photos of my pieces. That has been an on-going problem ever since I opened the Etsy site. No matter what I tried, I just couldn't get nice, clear, close up photos. The light box, easy to make from a heavy cardboard box (many examples found on Pinterest), will fix all that and make the site look more professional.
So that has been my month of February. How did yours go?
Monday, January 20, 2014
Deconstruction
It seems I have been on a path of deconstruction for a long time. It started with clothing, like taking things from the Goodwill, cutting them up (deconstruction), and making them into something else. Over time, it has applied to a lot of other things, although the other things might be defined better as downsizing. But it's all of a piece...the effort to start over, clean up, organize, and rethink.
The deconstruction of clothing has been a lot of fun, and a wonderful learning experience which is still ongoing. I have lots of ideas for things and techniques I want to try. The Goodwill has become my favorite shopping place, despite the rather creepy atmosphere, and the transients that haunt the place—to keep warm in the winter, and to cool off during the summer. There is also a part of me that feels a bit guilty for shopping there, when I see people who obviously can't afford to shop anyplace else, when for me it is just to troll for future projects. But I still go, and I still find things I can take apart and put back together as something new.
The deconstruction of my life is a bit different, and in some cases hard on the emotions. For almost a year I have been in the process of getting rid of stuff that I don't really need, or use. This involves giving family heirlooms to other members of my family to pass on, since Robert and I have no children. Mostly it means going through drawers, closets, and the (gasp) garage, and cleaning out stuff that hasn't seen the light of day in years. It's a little appalling how much clutter and "stuff" can accumulate over the years without us being aware of it, until a drawer is so crammed with junk you can't open it, or there is a wall of boxes in the garage that prevents you from getting to the washing machine. The revelation in all this, is that once you start getting rid of all that extraineous stuff, you start to feel lighter, freer, unburdened. I still have a long way to go in this process, but I keep working at it, one drawer, box, or cupboard at a time. I have taken carloads of stuff to the Goodwill, which I sorta think of as paying it forward. They will be getting lots more, and it doesn't hurt that it's a nice little tax write-off.
This emotional deconstruction can also apply to people. There comes a time when you realize some people don't make your life easy, and in fact, can make you a crazy person. To decide to eliminate these people from my life is a hard thing to do, especially if it is someone I have known for a long time. The question I asked myself, "Is being around this person hard work, or do they make being friends easy?" This is not to imply that I abandon friendships just because things get a little rough sometimes. All relationships go through those kinds of stages. What I mean is the type of person who just constantly becomes more of an irritant, someone I have to walk on eggshells around in order not to tick them off, and whose negative attitude toward other people starts to rub off on me without my being aware of it, until suddenly I think, "Wait a minute, that's not how I think about so-and-so, who has never done anything to me." It is then that I decide, enough is enough. It's sad, since these same people can be generous and giving, but not enough to make up for the other half of their personality. Fortunately, I have not had to make that decision often, and it is always painful when I do, but the relief afterwards, knowing that I will no longer have to be constantly on my guard around this type of person, is the reward.
My current act of deconstruction is with my jewelry. I have pieces that have been around for years and never sold. Some are ones I made when I first started learning how to work with beads and wire, others are pieces that for whatever reason just didn't sell. So the other day I decided to go through all the things I had and take apart the ones that had been hanging around way too long. Some were pieces that I really liked, and I was a little sad that no one else liked them as much as I did, but ah well. After about two hours, I ended up with a great pile of components all ready to be made into something new, which is exciting. I also went through my stash of beads and findings and got pretty mercenary about tossing things I'd had for eons and never used. I am also upgrading my stock, so pitched anything that looked a bit too shoddy or worn. All of those bits and pieces went into a big plastic bag, which will also be donated to the Goodwill. I still have a few storage boxes to go through, but the bag is filling up nicely, and my work area is getting a lot more organized. I like that!
During this whole deconstruction process, I have had this picture in my head of a woman walking down a long road, carrying a huge, bulging knapsack on her back. As she walks along, things keep falling out of the knapsack. Behind her, for miles and miles, is a trail of "stuff" that she doesn't know is gone. But without realizing it, she is walking straighter, standing taller, and moving easier. Soon, there won't be anything left in that heavy knapsack, and then she'll be free.
The deconstruction of clothing has been a lot of fun, and a wonderful learning experience which is still ongoing. I have lots of ideas for things and techniques I want to try. The Goodwill has become my favorite shopping place, despite the rather creepy atmosphere, and the transients that haunt the place—to keep warm in the winter, and to cool off during the summer. There is also a part of me that feels a bit guilty for shopping there, when I see people who obviously can't afford to shop anyplace else, when for me it is just to troll for future projects. But I still go, and I still find things I can take apart and put back together as something new.
The deconstruction of my life is a bit different, and in some cases hard on the emotions. For almost a year I have been in the process of getting rid of stuff that I don't really need, or use. This involves giving family heirlooms to other members of my family to pass on, since Robert and I have no children. Mostly it means going through drawers, closets, and the (gasp) garage, and cleaning out stuff that hasn't seen the light of day in years. It's a little appalling how much clutter and "stuff" can accumulate over the years without us being aware of it, until a drawer is so crammed with junk you can't open it, or there is a wall of boxes in the garage that prevents you from getting to the washing machine. The revelation in all this, is that once you start getting rid of all that extraineous stuff, you start to feel lighter, freer, unburdened. I still have a long way to go in this process, but I keep working at it, one drawer, box, or cupboard at a time. I have taken carloads of stuff to the Goodwill, which I sorta think of as paying it forward. They will be getting lots more, and it doesn't hurt that it's a nice little tax write-off.
This emotional deconstruction can also apply to people. There comes a time when you realize some people don't make your life easy, and in fact, can make you a crazy person. To decide to eliminate these people from my life is a hard thing to do, especially if it is someone I have known for a long time. The question I asked myself, "Is being around this person hard work, or do they make being friends easy?" This is not to imply that I abandon friendships just because things get a little rough sometimes. All relationships go through those kinds of stages. What I mean is the type of person who just constantly becomes more of an irritant, someone I have to walk on eggshells around in order not to tick them off, and whose negative attitude toward other people starts to rub off on me without my being aware of it, until suddenly I think, "Wait a minute, that's not how I think about so-and-so, who has never done anything to me." It is then that I decide, enough is enough. It's sad, since these same people can be generous and giving, but not enough to make up for the other half of their personality. Fortunately, I have not had to make that decision often, and it is always painful when I do, but the relief afterwards, knowing that I will no longer have to be constantly on my guard around this type of person, is the reward.
My current act of deconstruction is with my jewelry. I have pieces that have been around for years and never sold. Some are ones I made when I first started learning how to work with beads and wire, others are pieces that for whatever reason just didn't sell. So the other day I decided to go through all the things I had and take apart the ones that had been hanging around way too long. Some were pieces that I really liked, and I was a little sad that no one else liked them as much as I did, but ah well. After about two hours, I ended up with a great pile of components all ready to be made into something new, which is exciting. I also went through my stash of beads and findings and got pretty mercenary about tossing things I'd had for eons and never used. I am also upgrading my stock, so pitched anything that looked a bit too shoddy or worn. All of those bits and pieces went into a big plastic bag, which will also be donated to the Goodwill. I still have a few storage boxes to go through, but the bag is filling up nicely, and my work area is getting a lot more organized. I like that!
During this whole deconstruction process, I have had this picture in my head of a woman walking down a long road, carrying a huge, bulging knapsack on her back. As she walks along, things keep falling out of the knapsack. Behind her, for miles and miles, is a trail of "stuff" that she doesn't know is gone. But without realizing it, she is walking straighter, standing taller, and moving easier. Soon, there won't be anything left in that heavy knapsack, and then she'll be free.
Thursday, January 9, 2014
Finish One, Start Another
Finish One
The finished project was the linen underdress for my SCA Spanish surcoate. The surcoate was one I made back in the mid-80s. I used to wear it with a white shirt and skirt. The shirt has since fallen apart, and the skirt is way too small in the waist. It is also black, and gathered. To undo all those gathers and try and mess with black thread on black cloth...well, let's just say I decided to make a proper linen underdress instead, which is what the garment would have originally been worn with anyway. One I could also wear with other costumes I already have, or ones I might make in future. Other than the cost of linen putting me into a major case of sticker shock, the project went quite well. Luckily, I had a 50% off coupon from JoAnn's Fabrics, so the cost was not as bad as it might have been, but yikes!
Here is the finished underdress. The only decoration is pearls sewn around the sleeve binding. Oh, and just one of the many things I love about linen is the way it drapes so beautifully.
This is the costume as it was worn, with the headpiece.
Start of Another
The new project is one I posted about back in September. Robert had picked up a long denim dress to use for a dummy he was making for a mounted archery event we were putting on in October. The dress didn't work for the dummy. At first, since it was a petite and too tight across the shoulders for me to wear, I was going to donate it back to the Goodwill, from where it came. But then I decided that if I cut the sleeves off, it would fit okay. So that's what I did, and I also cut off the collar. I left the edges raw, since I wanted them to fray. At that stage I put it on the back burner while we dealt with the mounted archery event, and then I moved on to the linen underdress. Today I pulled the duster back out from hiding, and started playing around with it.
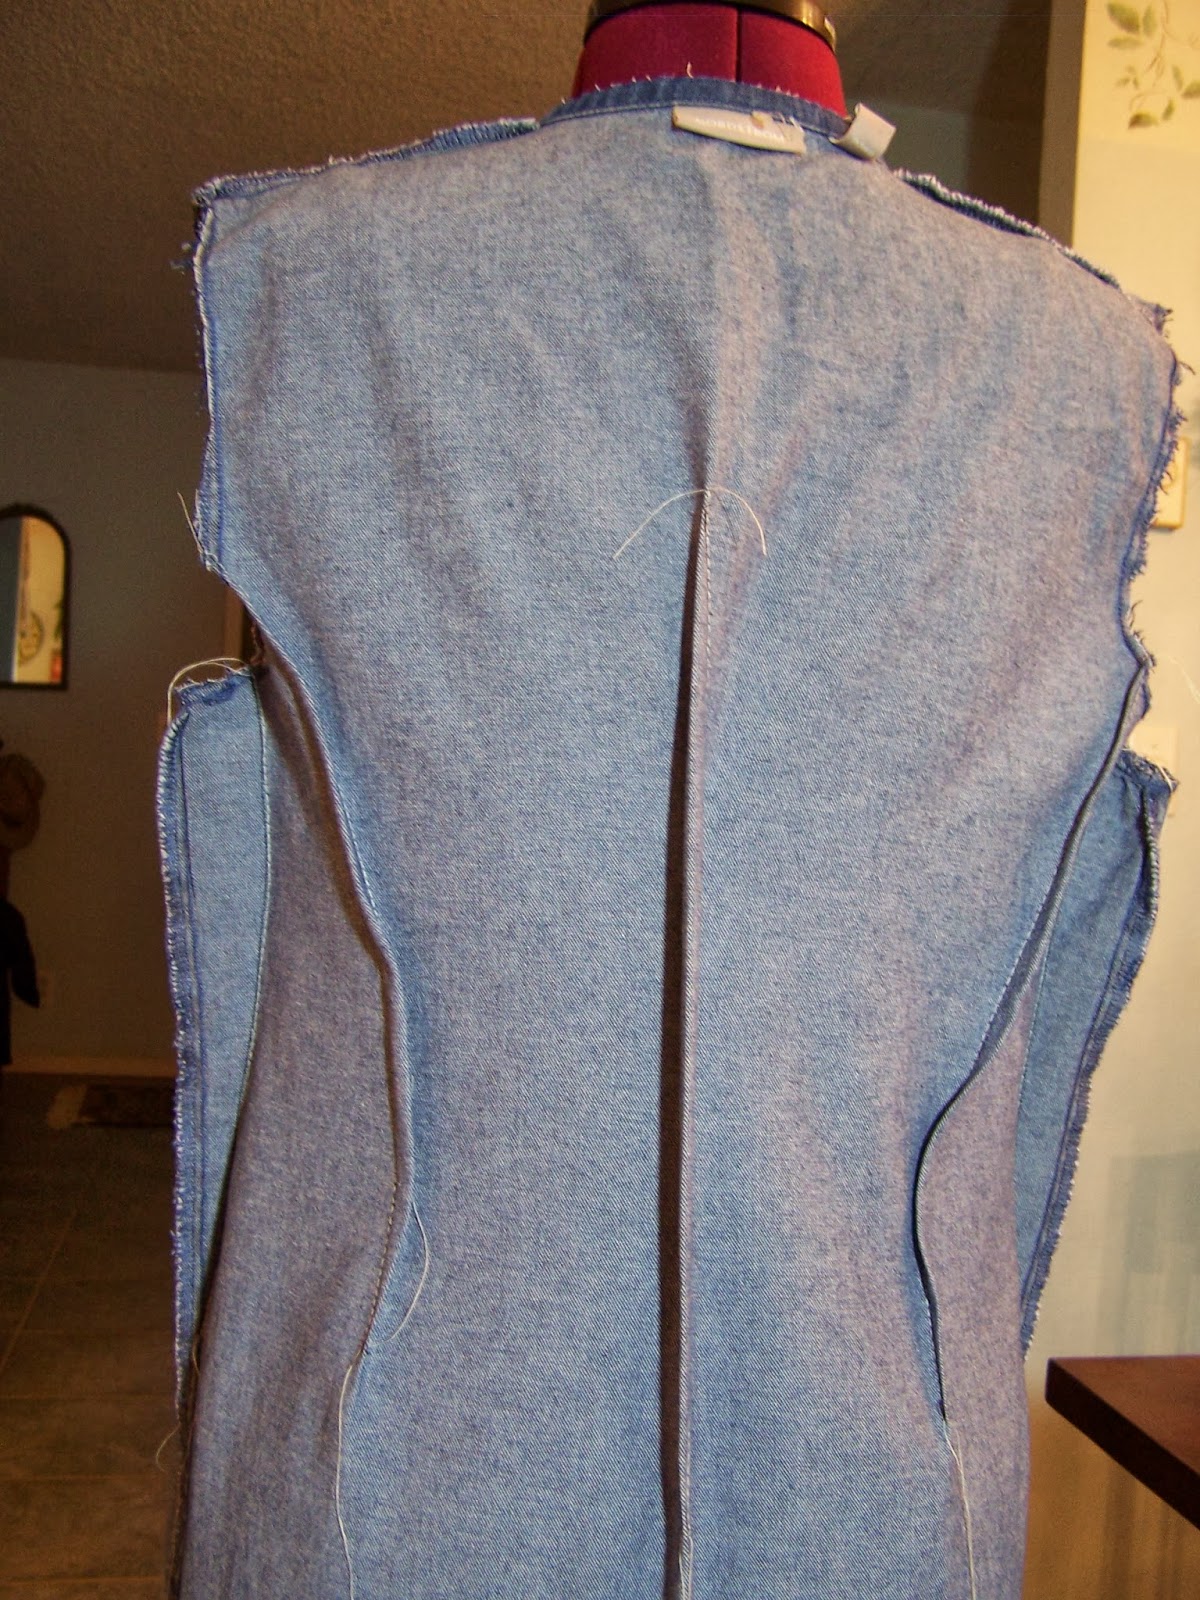
First thing I knew I would have to do, is take in the waist and sides. It was basically a sack, and I don't do sacks (why work to keep a nice trim waist, and then hide it under sacky clothes?). So, I put it, inside out, on Inara, and started pinning darts up the center back and taking in fabric at the side seams. This involved lots of pinning, trying on, re-pinning, and trying on again. I am no tailor, so this darting and fussing is new to me. It became clear that if I didn't also take up a lot of slop at the sides under each armhole, the darting in the back wouldn't really take in enough excess fabric to give me the look I wanted. So after a lot of pinning, adjusting, basting, and finally sewing it all down, this is what I got.
This is before I removed the basting stitches (in off-white thread), cut away the excess fabric, and ironed it all. You can see that I really had to cut a lot of fabric away from under each arm, then taper the seam back into the existing side seam.
Then I sewed everything down, trimed out the excess fabric, and ironed the piece (and apparently didn't take a photo of that stage). Next was to mark the split up the back with soap.
I sewed a 1/4 inch seam on either side of the soap mark, squaring off the end. Then I...gasp...cut up the back, following the soap mark.
This is where things got left today. Next step is to stencil a design up the front, along the hem, and up the split in the back, with black fabric paint. I haven't found the right stencil yet, but am thinking of something vine-like. Last step will be to put in a black linen gore in the back where the split is, giving the duster some flair and a slight bustle effect. I will probably add jet and blue beads to the stencils, and small bits of black lace as reinforcement where the center dart ends above the split. I am also thinking of cutting off the hem of the duster, sewing around the edge with black thread, and letting the hem ravel like the neck and armholes. Yeah, I think I will do that.
I mentioned before, when I first posted photos of this duster, that if I got really insane, I would replace the buttons, but the buttons go all the way down the front. Replacing them would probably make me crazier than I already am...and yet. We'll see, when the piece is all done.
The finished project was the linen underdress for my SCA Spanish surcoate. The surcoate was one I made back in the mid-80s. I used to wear it with a white shirt and skirt. The shirt has since fallen apart, and the skirt is way too small in the waist. It is also black, and gathered. To undo all those gathers and try and mess with black thread on black cloth...well, let's just say I decided to make a proper linen underdress instead, which is what the garment would have originally been worn with anyway. One I could also wear with other costumes I already have, or ones I might make in future. Other than the cost of linen putting me into a major case of sticker shock, the project went quite well. Luckily, I had a 50% off coupon from JoAnn's Fabrics, so the cost was not as bad as it might have been, but yikes!
Here is the finished underdress. The only decoration is pearls sewn around the sleeve binding. Oh, and just one of the many things I love about linen is the way it drapes so beautifully.
This is the costume as it was worn, with the headpiece.
Start of Another
The new project is one I posted about back in September. Robert had picked up a long denim dress to use for a dummy he was making for a mounted archery event we were putting on in October. The dress didn't work for the dummy. At first, since it was a petite and too tight across the shoulders for me to wear, I was going to donate it back to the Goodwill, from where it came. But then I decided that if I cut the sleeves off, it would fit okay. So that's what I did, and I also cut off the collar. I left the edges raw, since I wanted them to fray. At that stage I put it on the back burner while we dealt with the mounted archery event, and then I moved on to the linen underdress. Today I pulled the duster back out from hiding, and started playing around with it.
First thing I knew I would have to do, is take in the waist and sides. It was basically a sack, and I don't do sacks (why work to keep a nice trim waist, and then hide it under sacky clothes?). So, I put it, inside out, on Inara, and started pinning darts up the center back and taking in fabric at the side seams. This involved lots of pinning, trying on, re-pinning, and trying on again. I am no tailor, so this darting and fussing is new to me. It became clear that if I didn't also take up a lot of slop at the sides under each armhole, the darting in the back wouldn't really take in enough excess fabric to give me the look I wanted. So after a lot of pinning, adjusting, basting, and finally sewing it all down, this is what I got.
This is before I removed the basting stitches (in off-white thread), cut away the excess fabric, and ironed it all. You can see that I really had to cut a lot of fabric away from under each arm, then taper the seam back into the existing side seam.
Then I sewed everything down, trimed out the excess fabric, and ironed the piece (and apparently didn't take a photo of that stage). Next was to mark the split up the back with soap.
I sewed a 1/4 inch seam on either side of the soap mark, squaring off the end. Then I...gasp...cut up the back, following the soap mark.
This is where things got left today. Next step is to stencil a design up the front, along the hem, and up the split in the back, with black fabric paint. I haven't found the right stencil yet, but am thinking of something vine-like. Last step will be to put in a black linen gore in the back where the split is, giving the duster some flair and a slight bustle effect. I will probably add jet and blue beads to the stencils, and small bits of black lace as reinforcement where the center dart ends above the split. I am also thinking of cutting off the hem of the duster, sewing around the edge with black thread, and letting the hem ravel like the neck and armholes. Yeah, I think I will do that.
I mentioned before, when I first posted photos of this duster, that if I got really insane, I would replace the buttons, but the buttons go all the way down the front. Replacing them would probably make me crazier than I already am...and yet. We'll see, when the piece is all done.
Thursday, December 26, 2013
Christmas
To say I was not in the Christmas spirit this year is a mild understatement. That probably had a lot to do with the fact that I had been cabin bound for over two weeks due to the glacier of ice on the dirt road leading out of our place. My husband took the only ride that would get off the property, so I was stuck. No outings, no shopping, nadda. When it came time to put up the decorations, I was bitching and whinging about how pointless it all was, and why was I even bothering. At one point I even ended up sitting on the couch in tears, with Robert giving me that, "Hmmm, must be a hormonal moment" look.
But I battled on, put up some decorations, and hoped that the ice would clear up in time for the champagne brunch planned for Christmas day. Last year it got postponed until New Years because we still had five inches of snow on the ground, and the small cars my family drives would not make it up and over the little hill to get to our driveway. I was afraid this year was going to end up being a repeat, this time due to ice. It also occurred to me that, since the weather in December is usually dicey, and our road even dicier, maybe it would be a better idea if we did Christmas in July instead. I could pull out the holiday dishes and we could serve BBQ chicken instead of baked ham.
Mother Nature decided to give us a break, the temps rose to a balmy 45 (I was tempted to break out my shorts!), and the ice finally melted. The brunch was still a "go." And it turned out to be a lovely family get-together. Everyone contributed to the meal, we drank mimosas, and after the food, we all sat in front of the television and watched Holiday Inn with Fred Astair and Bing Crosby. This was a real breakthrough, since my family tend to be hit-and-run eaters. Show up for dinner, eat, and bail out before even the sauce on the empty plates has congealed. For them to hang around for almost three hours talking, and then watching (and some sleeping through) a movie was a real feather in my holiday cap.
Here is a photo of the table, before everyone sat down to eat. It's a bit cramped, since my table was originally designed to seat only six. With a little scooching, I can sit eight, but there were nine of us, so I ended up sitting on the end, with a table leg between my knees. Now that the holiday feasting is over, my dining room will revert back to a sewing room.
In the back corner is Inara, wearing my Spanish surcoat, made 30+ years ago. I have pulled it out of retirement and am making an under-dress to wear with it. I used to wear a shirt and long skirt with it, but the shirt fell apart, and the skirt is too tight (and is black with miles of gathers, sewn with black thread, and the thought of ripping all that out and trying to resew it gave me a headache), so I am making a lovely, off-white linen under-dress, which is what the garment would originally have been worn with anyway. That whole project is for an SCA Hogmanay feast (traditional Scottish New Year celebration) coming up January 4th.
As for the coming new year, I suspect it will be pretty much a repeat of 2013 = riding and mounted archery, sewing, beading, drawing, jewelry making, and going to various SCA and horse events. Maybe adding in some experiments with new art techniques or supplies. I have more costumes ideas in the works as well (too much time spent on Pinterest looking at costume eye-candy is to blame), to replace or supplement the old costumes we are still wearing, some of them looking pretty shabby.
So Happy New Year to those who stop by, and wishing you all the best in the coming months.
But I battled on, put up some decorations, and hoped that the ice would clear up in time for the champagne brunch planned for Christmas day. Last year it got postponed until New Years because we still had five inches of snow on the ground, and the small cars my family drives would not make it up and over the little hill to get to our driveway. I was afraid this year was going to end up being a repeat, this time due to ice. It also occurred to me that, since the weather in December is usually dicey, and our road even dicier, maybe it would be a better idea if we did Christmas in July instead. I could pull out the holiday dishes and we could serve BBQ chicken instead of baked ham.
Mother Nature decided to give us a break, the temps rose to a balmy 45 (I was tempted to break out my shorts!), and the ice finally melted. The brunch was still a "go." And it turned out to be a lovely family get-together. Everyone contributed to the meal, we drank mimosas, and after the food, we all sat in front of the television and watched Holiday Inn with Fred Astair and Bing Crosby. This was a real breakthrough, since my family tend to be hit-and-run eaters. Show up for dinner, eat, and bail out before even the sauce on the empty plates has congealed. For them to hang around for almost three hours talking, and then watching (and some sleeping through) a movie was a real feather in my holiday cap.
Here is a photo of the table, before everyone sat down to eat. It's a bit cramped, since my table was originally designed to seat only six. With a little scooching, I can sit eight, but there were nine of us, so I ended up sitting on the end, with a table leg between my knees. Now that the holiday feasting is over, my dining room will revert back to a sewing room.
In the back corner is Inara, wearing my Spanish surcoat, made 30+ years ago. I have pulled it out of retirement and am making an under-dress to wear with it. I used to wear a shirt and long skirt with it, but the shirt fell apart, and the skirt is too tight (and is black with miles of gathers, sewn with black thread, and the thought of ripping all that out and trying to resew it gave me a headache), so I am making a lovely, off-white linen under-dress, which is what the garment would originally have been worn with anyway. That whole project is for an SCA Hogmanay feast (traditional Scottish New Year celebration) coming up January 4th.
As for the coming new year, I suspect it will be pretty much a repeat of 2013 = riding and mounted archery, sewing, beading, drawing, jewelry making, and going to various SCA and horse events. Maybe adding in some experiments with new art techniques or supplies. I have more costumes ideas in the works as well (too much time spent on Pinterest looking at costume eye-candy is to blame), to replace or supplement the old costumes we are still wearing, some of them looking pretty shabby.
So Happy New Year to those who stop by, and wishing you all the best in the coming months.
Labels:
Christmas,
costume,
New Years,
projects,
table setting
Subscribe to:
Posts (Atom)