"To live in the world without becoming aware of the meaning of the world is like wandering about in a great library without touching the books.".....The Secret Teachings of All Ages

"Neither aesthetics nor money-spent make a good studio-it's what you make inside it that really counts"...Shanna Van Maurice, artist.


Wednesday, December 20, 2023

Butterfly on Bone Vest Part 2

This is the more boring part of getting ready to appliqué the bone fabric onto the vest. I need to practice free stitching, which as stated in part one, I have never done. Today was prep day.

The sequence shows the VERY ratty pair of jeans my husband donated to the cause. I cut the legs off then opened them up. Using a 5" x 5" piece of card stock and a small bar of soap, I marked squares and cut them out,  then ironed them. The last one I ironed on one of the butterflies. All these will be used to practice free sewing. I used the jeans since the vest is also pretty heavy denim. I wanted to know how that would work under the needle. 

Next will be the actual stitching. Might not get to that until after Christmas. 


Just a note. On dark fabric soap makes a good temporary mark for quick jobs. You can rub it off with a damp cloth when done. Only caveat, it doesn't hold up over the long haul. 


Saturday, December 9, 2023

Butterfly On Bone Vest Part 1

After some thought...lots of thought...and a question post on FB about the usefulness of blogs or the lack thereof, I decided to fire this one back up. Mainly as a resource for myself, to keep a record of what I did, how I did it, and maybe why I bothered. Also a report on either success or failure. All this because as I get older my memory isn't all that it used to be! Alas. I wish to spare myself the frustration of not remembering how I did something, or what I used. 

So, first project is a denim vest I bought at the Goodwill for about $4:50. I found the skeleton and the butterfly printed fabrics at JoAnns. 


Here is the process.

I made a template of the space between the side seams out of clear photo protectors cut open to lay flat (they were the only thing I could find that was clear, and light enough to cut through. I purchased them at Staples). I laid this over the fabric to get the best position of the design. I drew around the template with a red fabric marker pencil, then cut the fabric out leaving a large margin - about three or more inches. 

Here is the fabric cut out and pinned to the vest at the top, just to give me a ballpark idea of how it would look.


At this point I got out the butterfly fabric, fused it to Heat and Bond, and cut out the butterflies, leaving the paper backing on. 


Then I pinned the butterflies onto the skeleton fabric, moving them around until I liked the way they looked. I then carefully unpinned the skeleton fabric from the vest and laid it on my ironing board, unpinned each butterfly one at a time, peeled the backing paper off and ironed it in place. 


This is where I stopped today. I want to look at it for a while and decide if I want to iron on more butterflies. When satisfied, I intend to pin the skeleton fabric in place on the vest, then in black thread free-sew around the bones, and also secure the butterflies the same way. Then with a lighter thread I will free-sew the background shapes. Essentially appliquéing everything to the vest. However, I have never done any free-sewing, so I am going to practice a bit before I attempt the vest. 


Note to self: Next time put a protective cloth over your ironing board, or make sure you keep the iron within the fabric piece when heat bonding. You know, so you don't leave a frame of sticky bonding glue fused onto your ironing board cover.


If anyone has any questions, feel free to leave them in the comments. 


Saturday, December 26, 2020

Beaded Embroidery Butterfly

This is my first attempt at beaded embroidery. It turned out better than I expected, but took longer than I expected.  So, here is my review of the process, the mistakes I made, and my final thoughts on the finished piece. A supply list will be given at the end.

First off, I had to organize my supplies. All of the embroidery thread I had was in a jumble in a big cat food tin. To find anything I wanted, and figure out how much of it I had on hand, involved digging through the mess of tangled threads, and half-empty skeins. I also had needles - sewing, beading, embroidery -  stashed everywhere. Not the best method of storing things.  This is what things looked like after I went through the tin, and a few other places I had socked stuff away. 


So, off to the hardware store I went, and bought one of those big organizers for nuts, bolts, washers, etc. Lots of drawers. So everything got stowed away by color, and then light to dark. Crochet hooks, and needles are in the bottom drawers. I  have several of these organizers that I use for jewelry making supplies, and also one in our bathroom that I keep my costume jewelry in. They are just so handy for everything, and I like that I can see the color of the threads without having to open the drawer. 


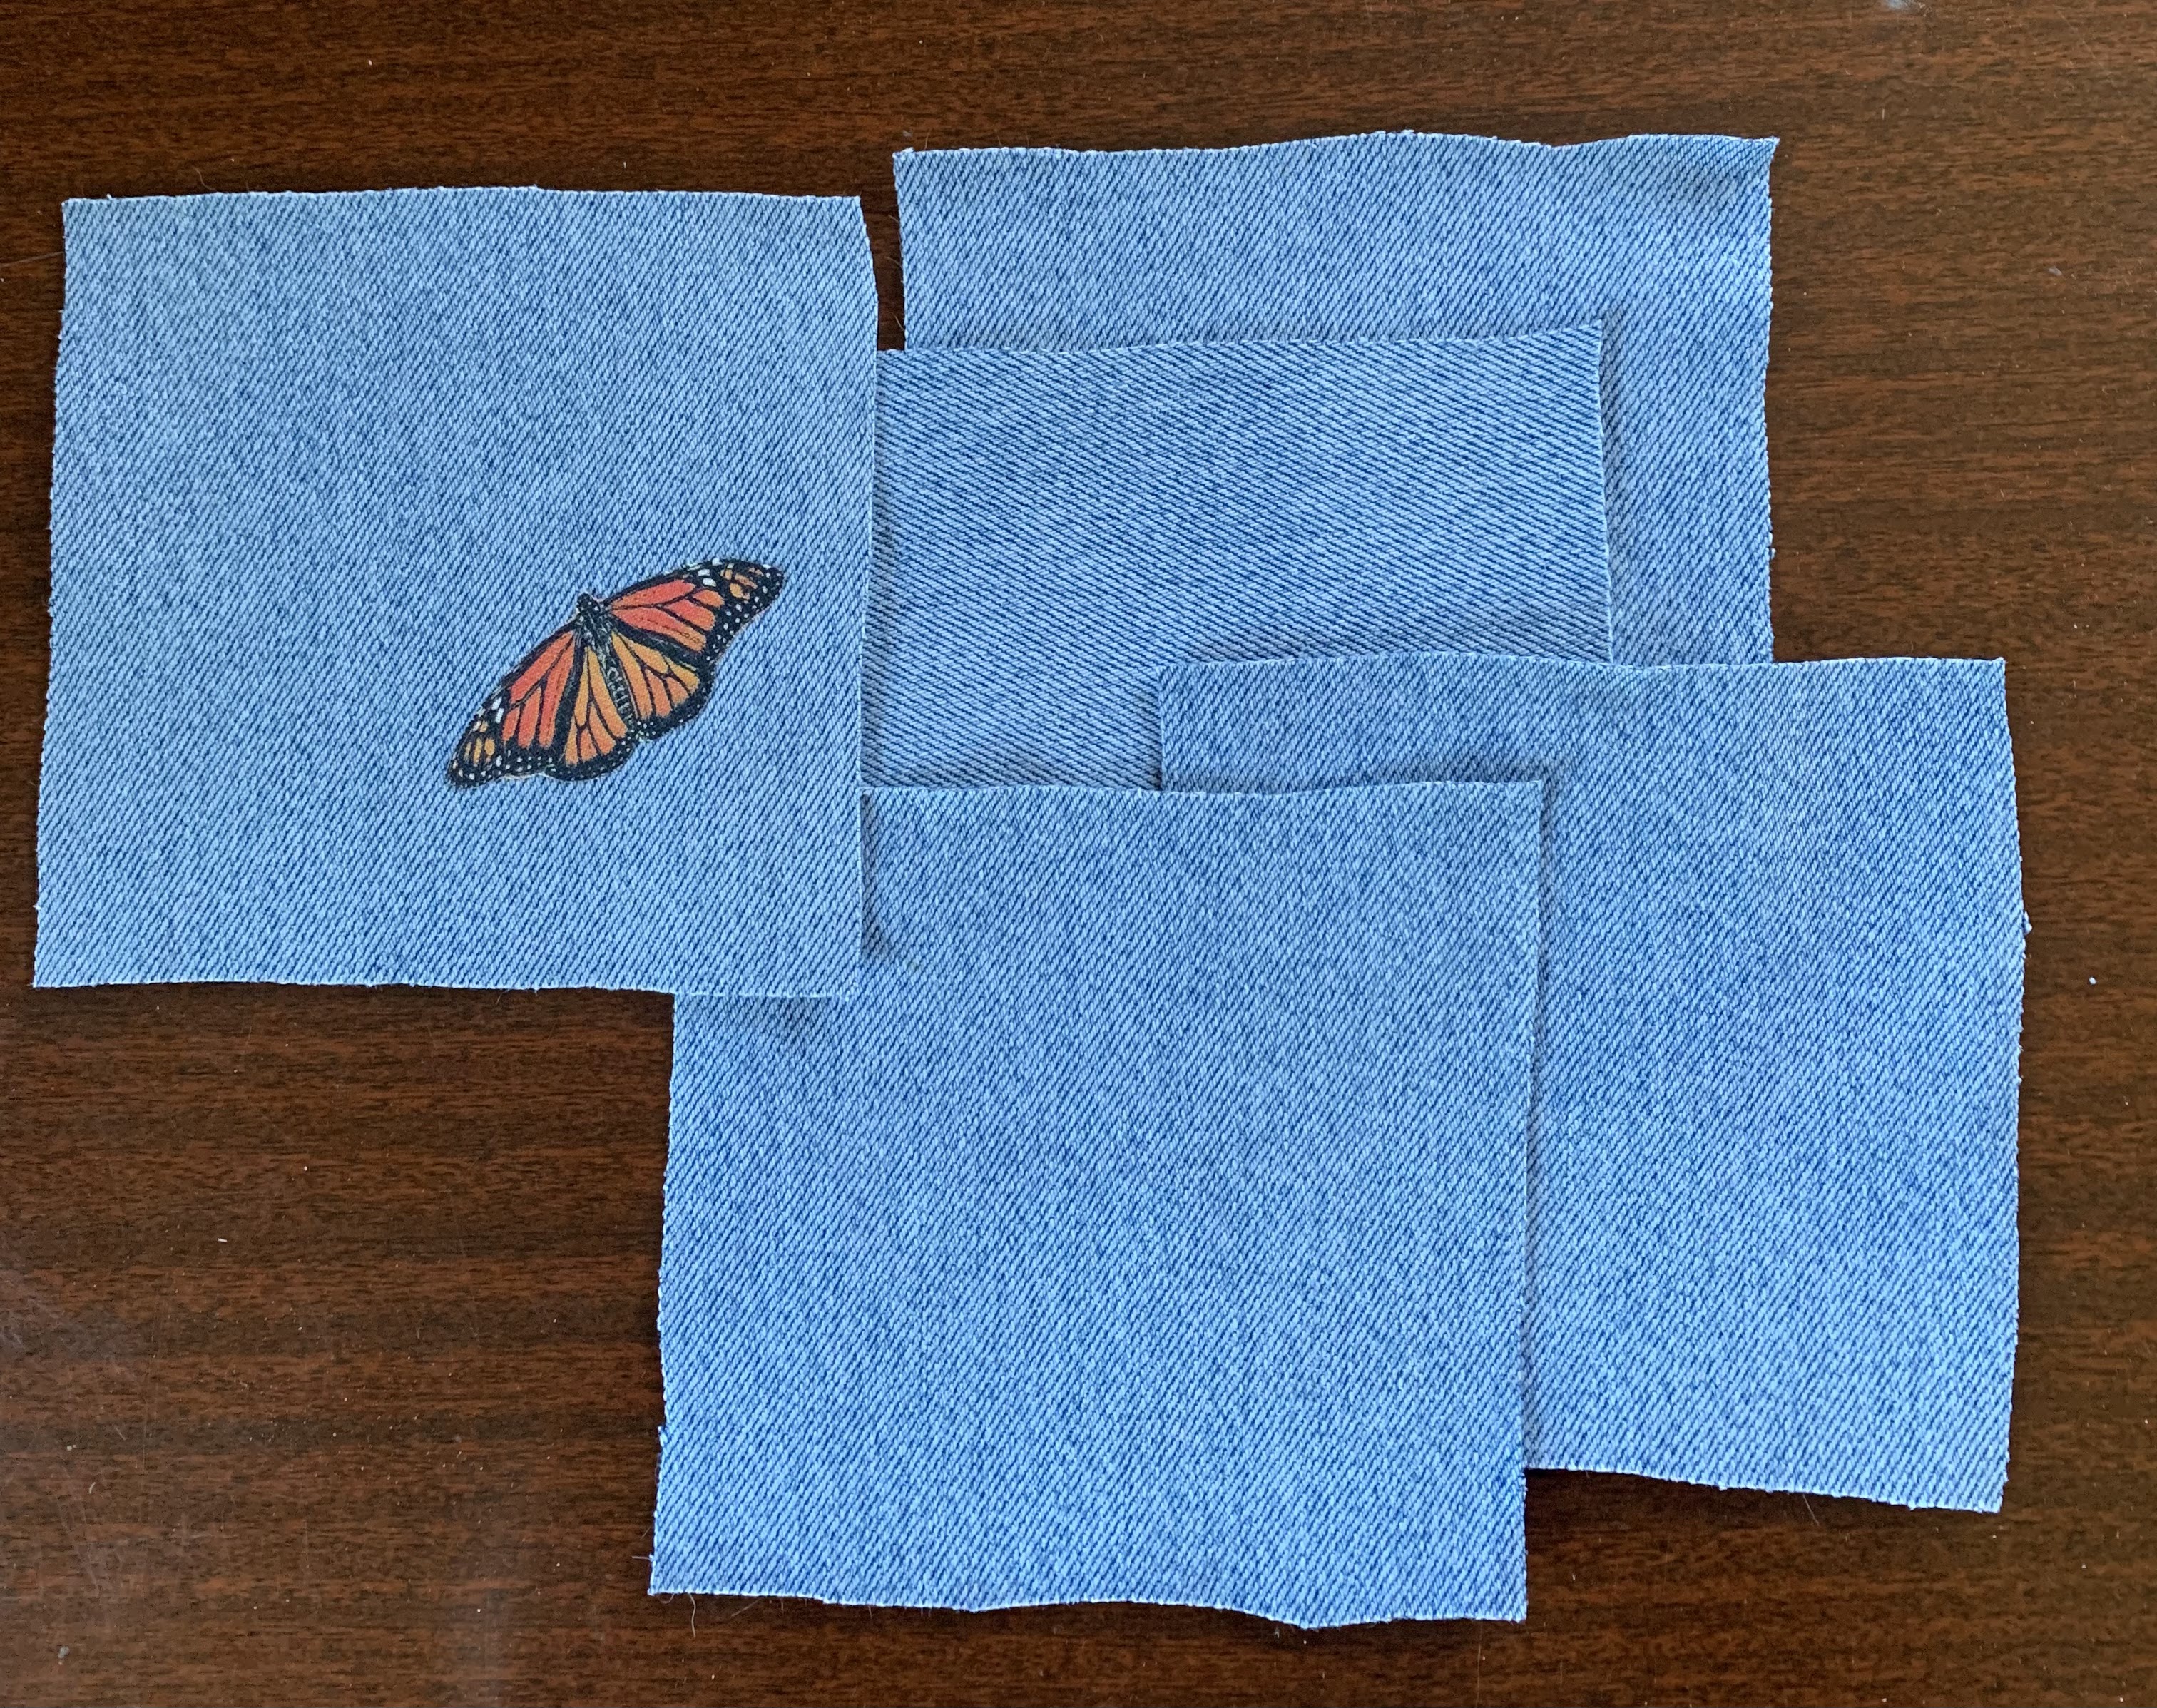
Then it was on to my first beaded embroidery project. I picked a photo of a butterfly (I knew I saved that calendar full of butterflies for a reason) mainly because the photos were large and showed the detail. Not that I was going to get that obsessive about it. Mine would be an interpretation of the little thing, not an exact replica. I was pretty sure this embroidery/beading technique was going to try my limited amount of patience anyway, so trying to do an exact copy of the pattern on a wingspan of only five and a half inches would have driven me insane.

Here is the project half finished, along with the source photo. 


 The piece was done on a linen blend fabric, and the design done by transfer pencil drawn on paper, then ironed onto the fabric. I will be researching better ways to get designs on the fabric, as this one didn't really work very well. The first time I ironed the design on the fabric, half the lines didn't show up, so I had to do it over. 

The stitches used are chain stitch for filling in the negative space (very tedious and time-consuming), back stitch, split stitch, and padded straight stitch. The beads were sewn on with upholstery thread. 

I first outlined the wings in beaded back stitch with small iridescent blue/black beads, then divided the wings with small black beads. Then I used straight stitch one way and then another to pad out the body of the butterfly. The head was done in one layer only. On the body, over the black embroidery thread I put in a layer of single strand indigo "silk" thread, but that was not very successful, as they didn't show up very well. Once the body was done, and the wings outlined in beads, I stitched the orange dots with straight stitch, then filled in the wing space with chain stitch. Lastly I sewed on the white beads over the chain stitch, and over the body.

There are two dark blue lozenge beads sewn to the thorax of the butterfly that barely show up in the photo. There is a black round bead for the head, and two small red beads for the eyes...which wouldn't lay snug, so the bug looks cockeyed. Two red crystals are at the end of the antenna. The white spots on the butterfly are done with flat white beads, some so small they wouldn't fit over a #10 beading needle - and since that is the smallest beading needle I have the patience to thread, those beads that wouldn't fit, got tossed in the thrash. 

Here is the finished butterfly. It was definitely a learning curve, as I hadn't done any embroidery since probably the 80s, other than the feather stitch I use to sew binding on to the clothes I make out of T-shirts. I need more practice. Lots more! And since doing tiny little chain stitches to fill in negative space took forever, I can see why learning to use a hook needle would be a good thing. Would make that whole process go much quicker, but from all I have read about them, it takes a while to get the knack of using one, and can be frustrating at first, so, another lesson in patience in my future. 

Here is the finished piece. 


Critique 

The design ended up asymetrical to a certain degree, the wings on the right are shaped slightly different that those on the left. This would not have been a huge deal if the piece wasn't beaded, but the white beads are more crowded together on the right than on the left. The body of the bug is cock-eyed - the head and thorax off center from the body. I jokingly remarked to my husband that it looked like it had hit a windshield. As stated above, I was not happy with the method of iron on transfer pencils to get the design on fabric, so that is my next puzzle to solve. Working with "silk" threads is a pain in the butt, but they look lovely. In this piece I should have just left them out, or used a lighter color, since they barely show up over the black. 

No, I am not going to show you the back of the piece. LOL I have my pride to consider. 


Supplies - I am keeping this pretty general, because everyone has their own favorite sizes of needles and threads to use. Also, as for bead size, these are ones I had on hand and were not in their original package, so I have no idea of their exact size. 

A remnant of linen blend cloth - this worked very nicely. 

2 different embroidery needles from a pkg of needles size 3-10, and a #10 beading needle. 

Black upholstery thread

DMC embroidery thread in black

DMC embroidery thread in orange

DMC "Silk" polyester thread in indigo blue

1 black round bead for the head

2 small red beads for the eyes

2 red crystal beads for the antenna. 

2 lozenge beads for the thorax

Multiple small white beads for the white spots on the wings

Dozens of small iridescent black/blue beads for the outline

Dozens of small black beads for the wing divisions


I enjoyed doing this project, even disregarding the many times I stabbed myself with that danged beading needle. They are SHARP! It was a good learning experience, showed me my weaknesses in both getting the design on cloth, and in working on the stitches. I suspect a hook needle is in my future, but will do a lot of practice with it before I use it on a project. I have read it can be a "tear your hair out" level of frustration until you get the knack. 

Not sure what I am going to do with this piece, but will appliqué it to something. It is quite sturdy, heavier than I thought it would be, and will stand up to washing just fine. That will be another test of how to use this technique on clothing, which is my main goal. 


Monday, November 9, 2020

It's Been A While.

I admit, it has been quite a long time since I posted here. Mainly because I was working on house projects - painting practically the whole inside of the house - and partly because I was working outside more. I didn't do much crafting or artwork. Fortunately, all those inside projects are finished, and with winter coming, chores in the garden are pretty much over. It was time to get back into the craft/art/writing groove.

There was a very good reason why this light jacket was my first project. Actually, it was one I started a couple of months ago. This jacket is to replace the first one I made for my friend for her birthday a year ago.  She and her partner lost their house, and everything in it, this summer to one of the California fires. Along with helping them replace some books and DVDs, I was eager to make another custom piece for her, to replace the one destroyed. 

And here it is. Goodwill T-shirt cut up the front, banding sewn on with embroidery thread in the feather stitch, and beaded with small, matte silver beads, and rough, flat, ceramic beads that came from a broken necklace (these beads had also been used on the jacket that was lost) I loved the shirt pattern, as it made me think of storm clouds. 


This is the beautiful jacket that was lost in the fire. The necklaces she managed to save when they evacuated. 


So now it is time for some new projects. With that in mind, I wanted to up the ante in my beadwork skills. Almost exclusively I have been beading over stencils. The only embroidery being sewing binding on to T-shirts or jackets, like the two above. Months ago, while at Barns & Noble Bookstore, I found a wonderful book titled "Bead Embroidery Chinese Style" by Han Yu. It was just the thing I was looking for. Lots of new techniques to learn - along with patience (not my best virtue) - that I could apply to the clothes I love to make from recycled T-Shirts. The idea of adding embroidery in conjunction with the beading and stenciling has me very excited. Many of the projects in the book are three-dimensional, which is a complete departure from how I am used to working. 

Having gone years without doing any intricate embroidery, I had to go buy supplies. JoAnn's here I come! Well, there I went, anyway. I bought a hoop, DMC thread in fun colors, and a package of assorted embroidery needles. Luckily, I already had a yard or so of organza, one of the fabrics recommended in the book, in a beautiful antique gold. So, now I am all set to play.


Needless to say, along with learning this new skill, I will also continue writing (I really need to finish that book!), and have decided to hook up with a trainer so my horse and I can learn dressage. That's pretty exciting as well.

Looks like it is going to be a busy, but fun, winter. 


Tuesday, July 7, 2020

Lots Going On

Much like my last post, the Covid-19 virus is keeping me home most of the time. So I continue to work with supplies that I have on hand...which for me is quite a lot. Between the beads, jewelry findings, Goodwill T-shirts, paints, and stencils, I am pretty much good to go with almost anything. I also managed to do a cute little birdbath from recycled bits. So, here we go.

All of the items are available other than those marked with an * after the description, which denotes they have already been spoken for. 


The top necklace is made of clear crystals (they look pink because they are picking up the color from the dress form), teal blue glass beads, and silver beads. There is a set of simple earrings to match.

The green necklace is made up of green glass beads, gold and green bulge beads, brass spacers, and vintage long glass beads taken from an old necklace that was broken. *


This necklace is made up of brass plaques set with black stones, and what was a filigree brass earring. 


Going from top left to right = Silver Celtic knot with yellow bead and silver bees *, Silver Scotch thistle hung with green beads and silver feathers *, Gold faux-coin discs (reverse side has a religious figure but I don't know who it is) with black and gold glass beads.*

Bottom left to right = Clear crystal and dark green beads, Blue squares topped with silver and blue beads, Pale blue squares topped with silver and opaque white mini-crystals. 


This shirt was one that had been cut out and beaded, then put on a back burner for over a year. I finally finished it. It is made of Goodwill T-shirts, stenciled, and beaded. The binding is sewn on with feather stitch embroidery. I may end up beading the binding as well, but for now at least it is off my "to finish" list. *


This is a shirt I did a while back, but I have decided to let it go. I have a lot of beaded shirts and my closet is starting to look a little OCD with beaded stuff. LOL The T-shirt is a size M, with a stenciled, beaded and stitched appliqué. The center piece is a silver Celtic knot. 


And this was my little recycle project. The wire base was a plant cage filled with succulents. They outgrew the basket that was in the bottom, so I took them out, and took off the top of the cage. The glass bowl was a light fixture we took out when we remodeled the kitchen. The small hole in the bottom was plugged with a bit from a kneaded art erasure (I couldn't find my floral putty). I filled the bowl with glass "stones" leftover from those we put in our propane fire pit. I am going to look for some artificial greenery to fill in the bottom of the cage. The crock was one I bought decades ago at the Rose Bowl swap meet, and the slate was leftover from another project. I added a couple of rocks for the birds to stand on and eh voila! Birdbath. It only took the birds about two days to find it and start to use it. There is also a little tree frog that likes to hang out in it as well. That made me quite happy. 

If you are interested in anything shown you can leave a comment here and I will get back to you. 

Hope you are all staying safe in these chaotic times. 

Thursday, May 28, 2020

While in Self-Isolation

I haven't talked about the Covid-19 pandemic and how it has affected not only my life, but the lives of others. I keep abreast of the latest scientific news, my husband (who works at an "essential" business) and I know what the risks are, and take precautions accordingly. And since both of us are in the "high risk" age group, we are cautious about talk of things opening up in our area. That being said, and with me being retired and pretty much an introvert, my lifestyle hasn't changed all that much. I try to concentrate on doing positive things, be it working in the garden, riding my horse, or raiding my stash of beads, jewelry findings, Goodwill T-shirts, stencils, art supplies, or writing. 

So between dragging a hose around to water the yard/garden, doing construction and painting of some Working Equitation obstacles for an upcoming WE clinic me and my partner are putting on June 6-7, and with outside temps rising into the 90s during the middle of the day, I have been retreating indoors and listening to Dr. Martin Shaw podcasts or his YouTube videos, and playing with jewelry making again. Last month I made a couple of necklaces at birthday gifts (see previous post), but  I wanted to do something a little more elaborate, again, using things I already had on hand. 

The first was this necklace, which I think has a very Renaissance flavor to it. I liked this necklace so much I intend to keep it, and that eventually when the artificial pearls start to lose their luster, I may remake it with real pearls. 


The one I just finished today is in a similar style, but made in a difference color scheme. The blue accent drops are from a vintage necklace picked up somewhere, that was broken, or missing pieces. I have had it for ages, so I don't really remember. 


They were not intended to be worn together, but they do make quite the statement when they are!


For both of these necklaces I made simple matching earrings. 

I had a lot of fun getting back into making jewelry, so I am looking forward making more pieces using only what I already have handy. 

Something else on my radar as a possible future project is a sweater coat made with some of my stash of Goodwill T-shirts. My inspiration for this comes from an amazing lady named Katwise, who makes stunning, one-of-a-kind sweaters and coats out of the sweaters she collects from all over the country. Most of her things, as much as I love them, are too flamboyant for me. However, I starting wondering if I could do something similar, a bit less flamboyant, more conservative in color, with the material I get from cutting up men's XXL T-shirts. This afternoon I made a quick sketch, thinking about a simple, simple knee-length coat, just to test and play around with to see if it would even work. For starters I found an old McCalls pattern I had (number 4243) that would give me a boxy bodice easily split up the middle, to which I could add sleeves and a pieced full skirt.  I also considered that if it worked, I could stencil and bead parts of it, to tart it up a bit. 

This is the rough sketch, with a few notes. Once the Working Equitation clinic is over and I can clear off my big worktable out in the garage (now covered with paints, and misc. building supplies) I can start playing with fabric again. With the summer temperatures rising into the high 80s and 90s, this will be a fun project to do when working outside is not really an option.


This is how an introvert stays sane in these chaotic times. Hope you  all stay safe and find your own ways to keep positive. 

Monday, May 18, 2020

Recycled Style 5

It has been quite a while since I posted anything here. Been working on other projects not related to clothing or beading. But now I am caught up, and can post three projects that were all finished up within the last month. Being in Covid-19 self-isolation for almost two months gave me plenty of time to finish these projects - and I admit, it helped that for two of them I was on a deadline. LOL

All material in these clothing items were T-shirts bought at the Goodwill unless otherwise noted. Beads and embroidery thread from my stash. 

Crafters/artists/jewelry makers/sewers, etc. sometimes get teased about all the supplies we stash away for "someday." But with all the stores closed due the pandemic, having a supply of things on hand to tide me over worked out really well. 

First item is a light jacket I made for a very good friend who shares the same birthday date as mine.  The necklaces were made to wear as a pair. 

The jacket was a woman's size M T-shirt that I cut up the middle, and also took about four inches off the sleeves to make them 3/4 length instead of full. The banding is sewn on with embroidery thread in a feather stitch, then beaded using regular sewing thread. The tank top under the jacket is an old one of mine, and used to show how the jacket could be worn. I like these light jackets for summer, so when I go into a restaurant where the air-conditioning is on full blast and set at arctic temperatures I won't freeze to death. 


The second project that I finished is this beaded and stitched mandala shirt. The stencil was done on a sleeve cut from another shirt (I have dozens of these sleeves, cut from XXL mens shirts when I use the body of the shirt as flat fabric). The paint color is Coastal Waters by Americana. The beads were ones from my stash. The stenciled sleeve was backed by another cut off sleeve, then pinned to the front of the shirt. Here is the sequence.


I like the design of this mandala very much, but in retrospect think it would have been better on the back of a jacket, or on a sweatshirt, as its size seems to overwhelm the T-shirt. 

Lastly is a necklace I made as a birthday gift. 


All this productivity has left me with just one old project to finish that has been sitting sidelined for months. With things still pretty much in lockdown, although some restrictions are lifting, I have plenty of time to catch up on things and then start new projects. That's always exciting. 

Hope you are all staying safe and healthy.