I haven't talked about the Covid-19 pandemic and how it has affected not only my life, but the lives of others. I keep abreast of the latest scientific news, my husband (who works at an "essential" business) and I know what the risks are, and take precautions accordingly. And since both of us are in the "high risk" age group, we are cautious about talk of things opening up in our area. That being said, and with me being retired and pretty much an introvert, my lifestyle hasn't changed all that much. I try to concentrate on doing positive things, be it working in the garden, riding my horse, or raiding my stash of beads, jewelry findings, Goodwill T-shirts, stencils, art supplies, or writing.
So between dragging a hose around to water the yard/garden, doing construction and painting of some Working Equitation obstacles for an upcoming WE clinic me and my partner are putting on June 6-7, and with outside temps rising into the 90s during the middle of the day, I have been retreating indoors and listening to Dr. Martin Shaw podcasts or his YouTube videos, and playing with jewelry making again. Last month I made a couple of necklaces at birthday gifts (see previous post), but I wanted to do something a little more elaborate, again, using things I already had on hand.
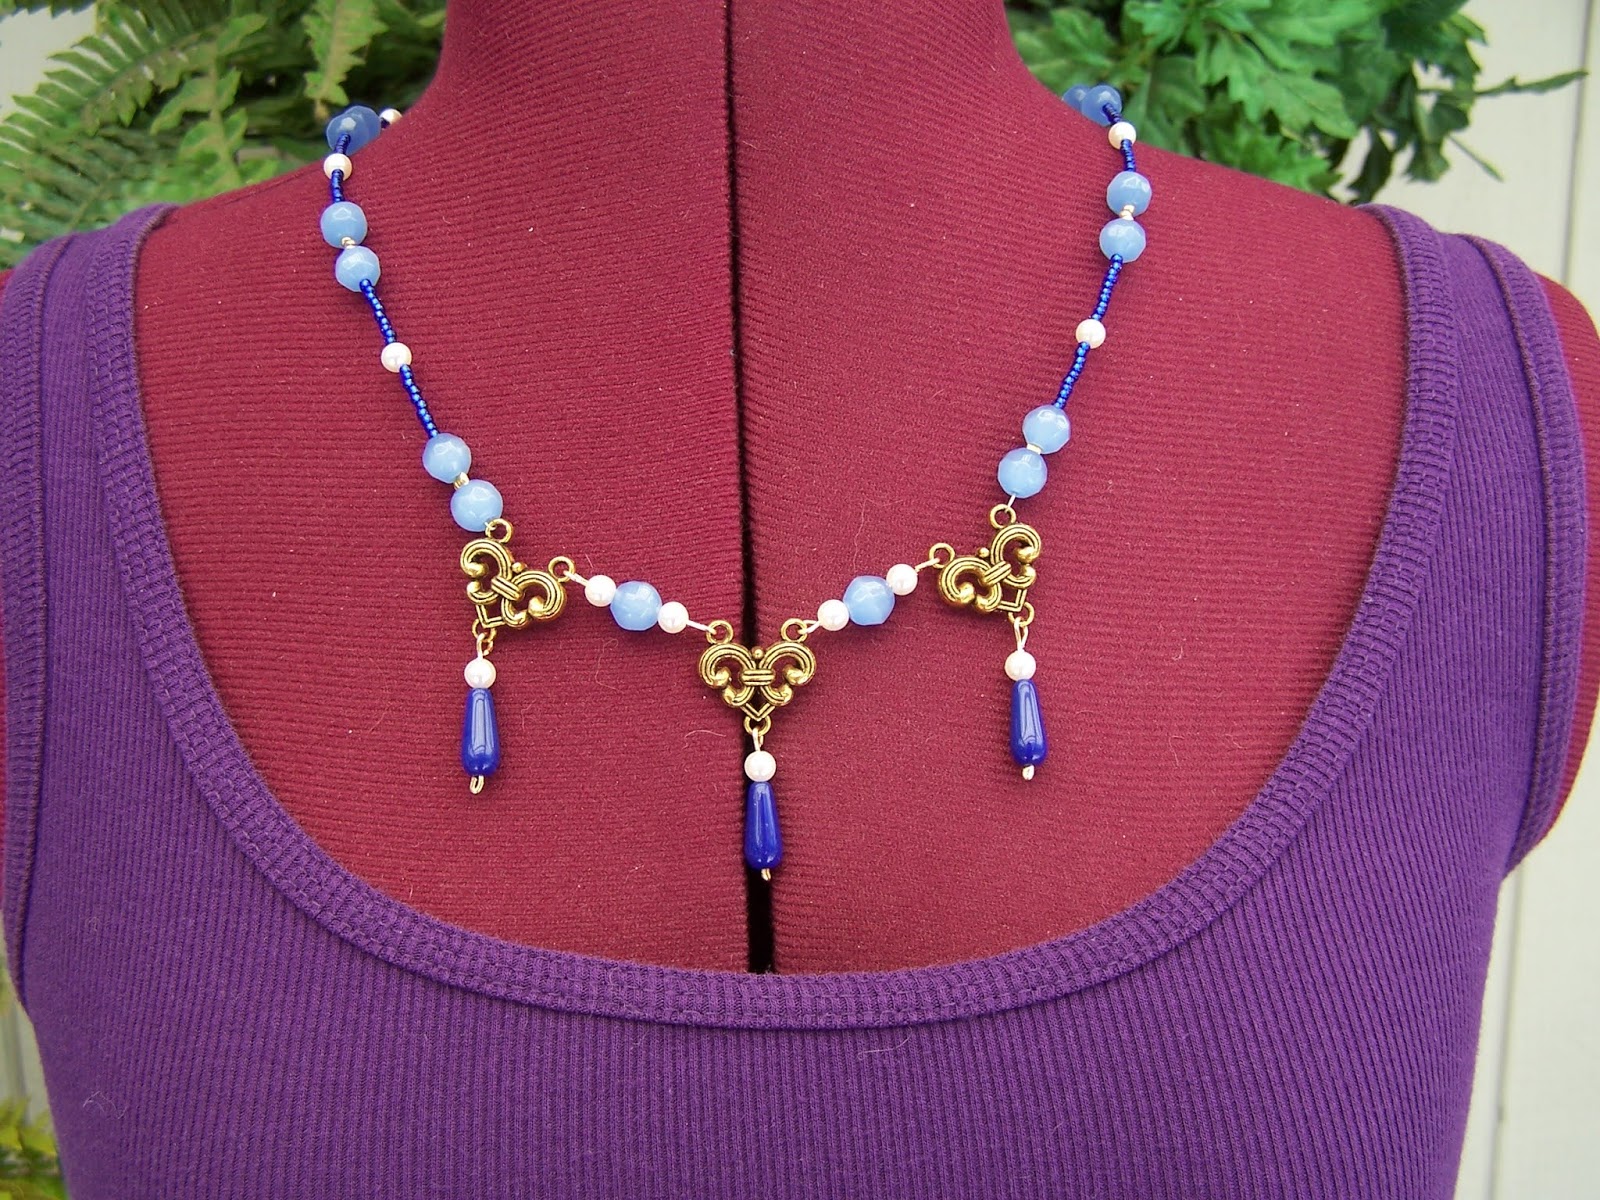
The first was this necklace, which I think has a very Renaissance flavor to it. I liked this necklace so much I intend to keep it, and that eventually when the artificial pearls start to lose their luster, I may remake it with real pearls.
The one I just finished today is in a similar style, but made in a difference color scheme. The blue accent drops are from a vintage necklace picked up somewhere, that was broken, or missing pieces. I have had it for ages, so I don't really remember.
They were not intended to be worn together, but they do make quite the statement when they are!
For both of these necklaces I made simple matching earrings.
I had a lot of fun getting back into making jewelry, so I am looking forward making more pieces using only what I already have handy.
Something else on my radar as a possible future project is a sweater coat made with some of my stash of Goodwill T-shirts. My inspiration for this comes from an amazing lady named Katwise, who makes stunning, one-of-a-kind sweaters and coats out of the sweaters she collects from all over the country. Most of her things, as much as I love them, are too flamboyant for me. However, I starting wondering if I could do something similar, a bit less flamboyant, more conservative in color, with the material I get from cutting up men's XXL T-shirts. This afternoon I made a quick sketch, thinking about a simple, simple knee-length coat, just to test and play around with to see if it would even work. For starters I found an old McCalls pattern I had (number 4243) that would give me a boxy bodice easily split up the middle, to which I could add sleeves and a pieced full skirt. I also considered that if it worked, I could stencil and bead parts of it, to tart it up a bit.
This is the rough sketch, with a few notes. Once the Working Equitation clinic is over and I can clear off my big worktable out in the garage (now covered with paints, and misc. building supplies) I can start playing with fabric again. With the summer temperatures rising into the high 80s and 90s, this will be a fun project to do when working outside is not really an option.
This is how an introvert stays sane in these chaotic times. Hope you all stay safe and find your own ways to keep positive.
"To live in the world without becoming aware of the meaning of the world is like wandering about in a great library without touching the books.".....The Secret Teachings of All Ages
"Neither aesthetics nor money-spent make a good studio-it's what you make inside it that really counts"...Shanna Van Maurice, artist.
Showing posts with label beading. Show all posts
Thursday, May 28, 2020
Monday, May 18, 2020
Recycled Style 5
It has been quite a while since I posted anything here. Been working on other projects not related to clothing or beading. But now I am caught up, and can post three projects that were all finished up within the last month. Being in Covid-19 self-isolation for almost two months gave me plenty of time to finish these projects - and I admit, it helped that for two of them I was on a deadline. LOL
All material in these clothing items were T-shirts bought at the Goodwill unless otherwise noted. Beads and embroidery thread from my stash.
Crafters/artists/jewelry makers/sewers, etc. sometimes get teased about all the supplies we stash away for "someday." But with all the stores closed due the pandemic, having a supply of things on hand to tide me over worked out really well.
First item is a light jacket I made for a very good friend who shares the same birthday date as mine. The necklaces were made to wear as a pair.
The jacket was a woman's size M T-shirt that I cut up the middle, and also took about four inches off the sleeves to make them 3/4 length instead of full. The banding is sewn on with embroidery thread in a feather stitch, then beaded using regular sewing thread. The tank top under the jacket is an old one of mine, and used to show how the jacket could be worn. I like these light jackets for summer, so when I go into a restaurant where the air-conditioning is on full blast and set at arctic temperatures I won't freeze to death.
The second project that I finished is this beaded and stitched mandala shirt. The stencil was done on a sleeve cut from another shirt (I have dozens of these sleeves, cut from XXL mens shirts when I use the body of the shirt as flat fabric). The paint color is Coastal Waters by Americana. The beads were ones from my stash. The stenciled sleeve was backed by another cut off sleeve, then pinned to the front of the shirt. Here is the sequence.
I like the design of this mandala very much, but in retrospect think it would have been better on the back of a jacket, or on a sweatshirt, as its size seems to overwhelm the T-shirt.
Lastly is a necklace I made as a birthday gift.
All this productivity has left me with just one old project to finish that has been sitting sidelined for months. With things still pretty much in lockdown, although some restrictions are lifting, I have plenty of time to catch up on things and then start new projects. That's always exciting.
Hope you are all staying safe and healthy.
All material in these clothing items were T-shirts bought at the Goodwill unless otherwise noted. Beads and embroidery thread from my stash.
Crafters/artists/jewelry makers/sewers, etc. sometimes get teased about all the supplies we stash away for "someday." But with all the stores closed due the pandemic, having a supply of things on hand to tide me over worked out really well.
First item is a light jacket I made for a very good friend who shares the same birthday date as mine. The necklaces were made to wear as a pair.
The jacket was a woman's size M T-shirt that I cut up the middle, and also took about four inches off the sleeves to make them 3/4 length instead of full. The banding is sewn on with embroidery thread in a feather stitch, then beaded using regular sewing thread. The tank top under the jacket is an old one of mine, and used to show how the jacket could be worn. I like these light jackets for summer, so when I go into a restaurant where the air-conditioning is on full blast and set at arctic temperatures I won't freeze to death.
The second project that I finished is this beaded and stitched mandala shirt. The stencil was done on a sleeve cut from another shirt (I have dozens of these sleeves, cut from XXL mens shirts when I use the body of the shirt as flat fabric). The paint color is Coastal Waters by Americana. The beads were ones from my stash. The stenciled sleeve was backed by another cut off sleeve, then pinned to the front of the shirt. Here is the sequence.
I like the design of this mandala very much, but in retrospect think it would have been better on the back of a jacket, or on a sweatshirt, as its size seems to overwhelm the T-shirt.
Lastly is a necklace I made as a birthday gift.
All this productivity has left me with just one old project to finish that has been sitting sidelined for months. With things still pretty much in lockdown, although some restrictions are lifting, I have plenty of time to catch up on things and then start new projects. That's always exciting.
Hope you are all staying safe and healthy.
Wednesday, July 3, 2019
Recycled Style 2
Number 2 in my ongoing attempt to get people inspired by using recycled clothes, whether you wear them "as is" or play around with modifying them, as I do. The garment industry is one of the top five sources of pollution in the world, so buying used clothing is just one little way you can help the environment.
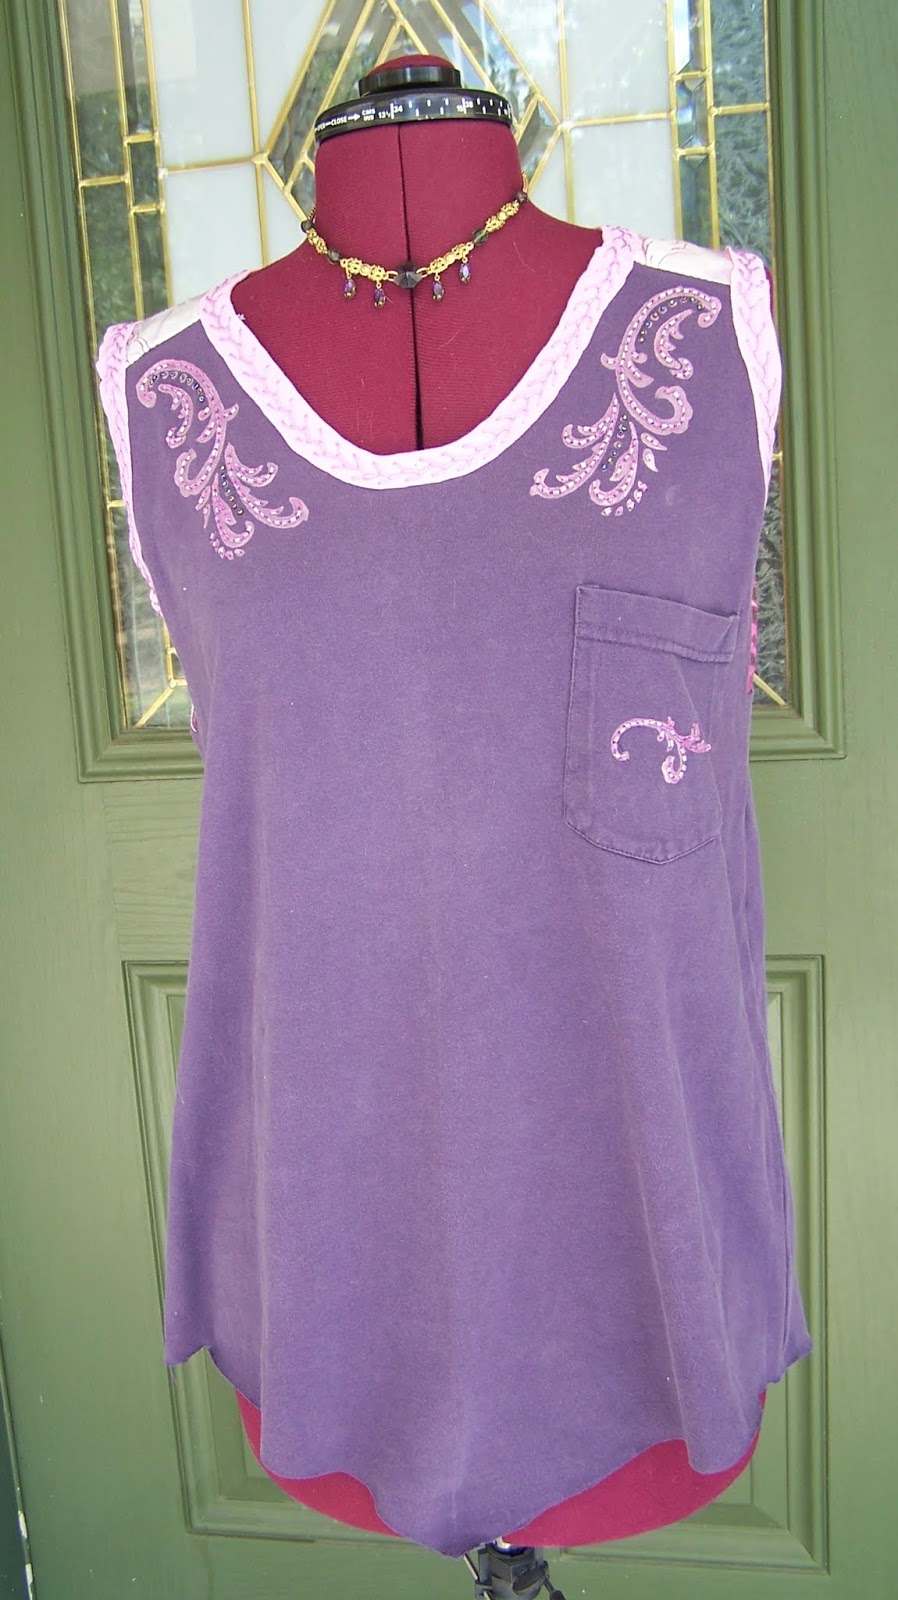
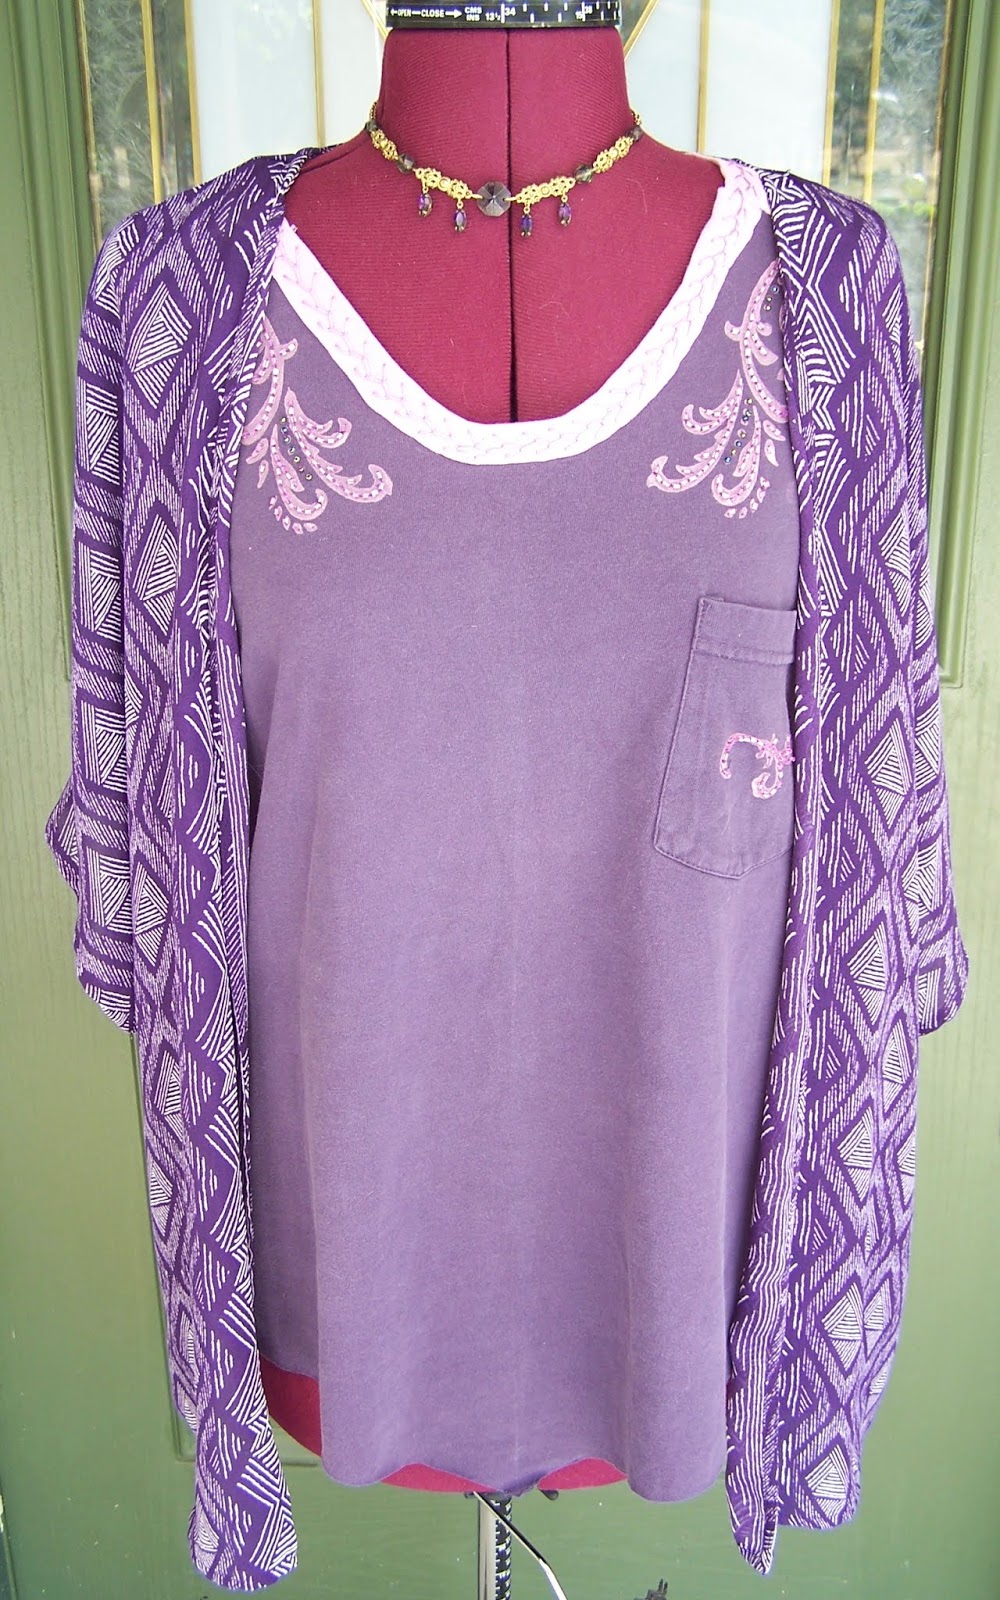
For this project I used one man's XXL T-shirt and one size large woman's shirt bought from the Goodwill. For the binding around the neck and armholes I cut strips from an old tank top of mine. Then I went through my stash of Goodwill kimonos to see if I had anything that would match. Bingo. Then I topped it off with a necklace I made years ago. All-in-all, it makes for a pretty nice outfit.
Here are the details.
Simplicity pattern 1463 (view D modified by me), stencil, Tulip Soft Cover fabric paint in Dusty Rose, pink bugle beads and purple seed beads, J & P Coats embroidery thread in a dusky rose (it was an old skein I'd had for years, with no color numbers on the sleeve)
Beads are sewn on with a back stitch using regular sewing thread doubled. These beads all had holes large enough that I could use a regular sewing needle instead of a beading needle. This made me VERY happy, as beading needles are a pain in the rear to thread. Well...for me, anyway.
The binding was hand sewn on with embroidery thread using a fly stitch. I cut strips 1 1/4" wide with a rotary cutter, then fold the strips in half the long way and iron them. This gives me the equivalent of bias tape, and I use the strips in exactly the same way.
One of the places I modify the pattern is to round off the neckline instead of leaving it a V. This makes it easier to sew the binding on.
Normally I avoid buying shirts with pockets, as it cuts down the amount of fabric I can use, but I liked the color of this shirt, and it was an XXL, so I had plenty to work with.
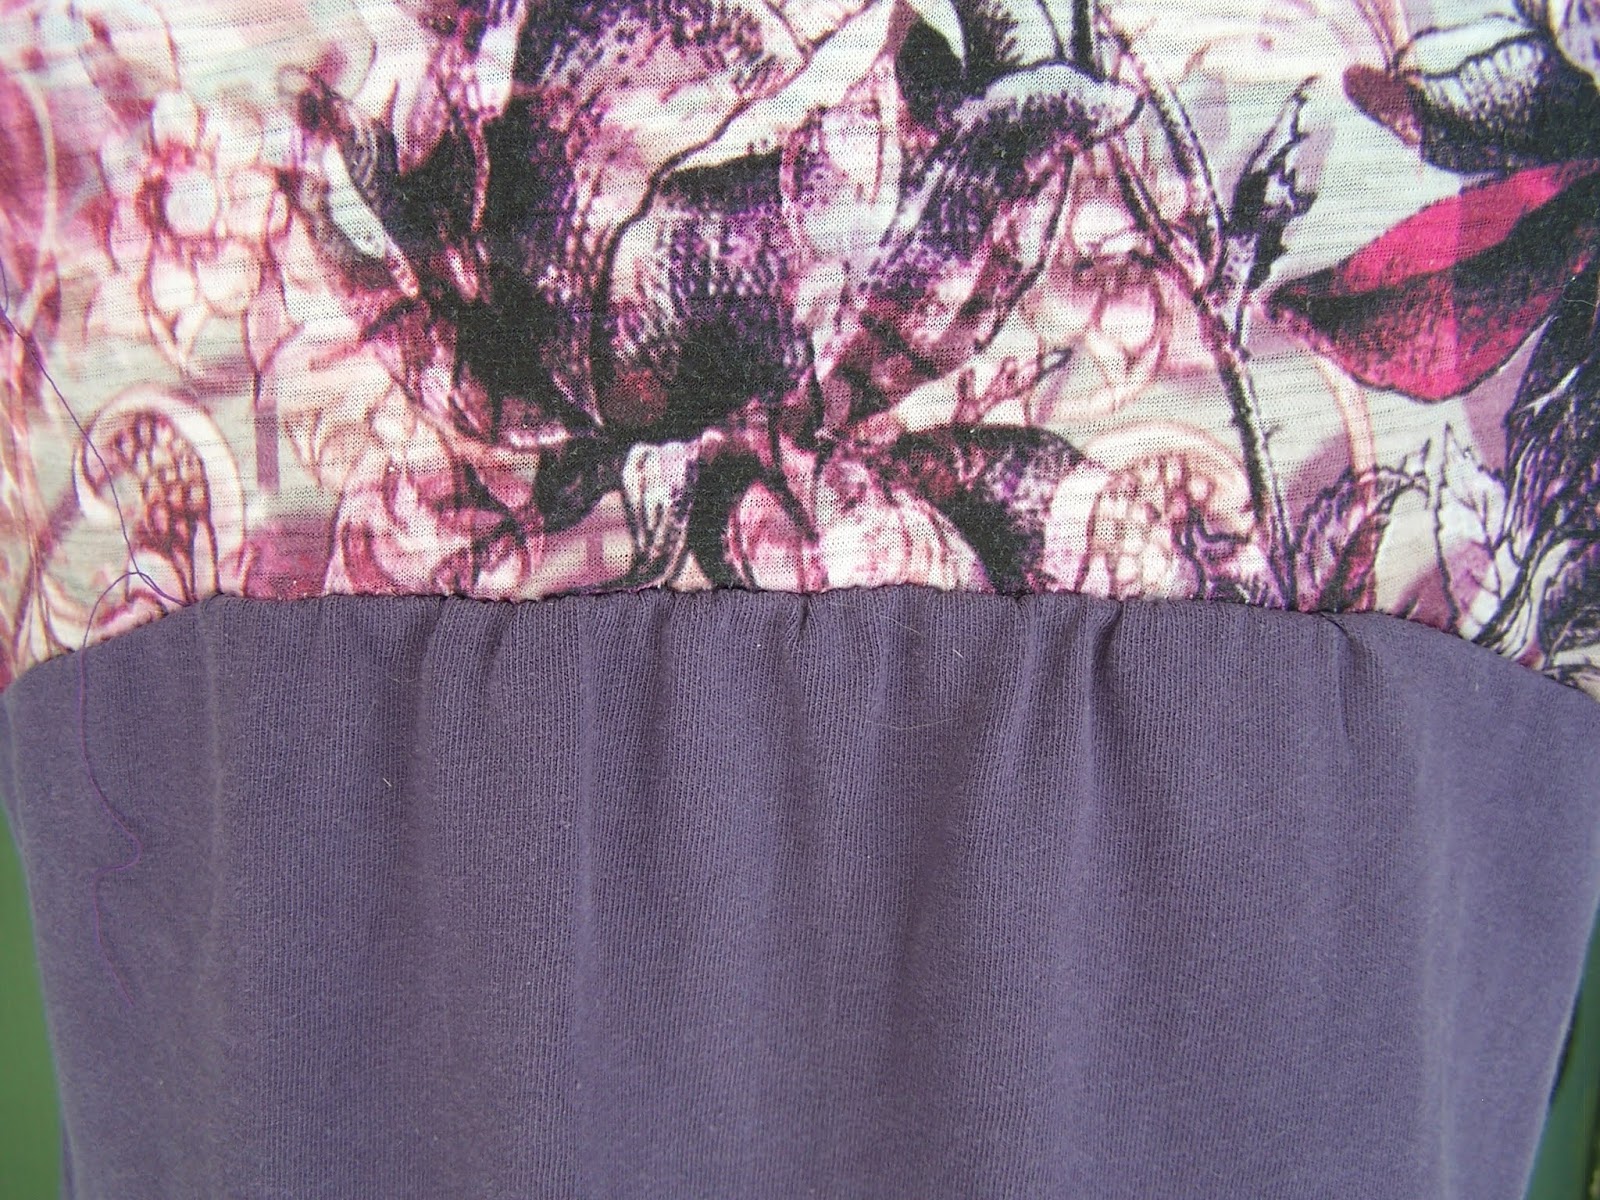
The back is also where I do a bit of altering from the pattern. When laying out the pieces, I add width to the center back (About two-three inches). I can get more gathers that way, which makes the lower part of the shirt hang a little nicer.
Next I added the Liz Claiborne kimono I had found last summer in the pajama section at the Goodwill. It is a great example of the kinds of things you can find that don't need any customizing or sewing...just a good wash.
The necklace was made from vintage navettes (the diamond shaped dangles) I bought years ago on Ebay, pieces of a vintage chain necklace that had belonged to my husband's grandmother, but was broken, and some beads from my stash. The center "jewel" is an old chandelier crystal.
A few notes.
The yoke on this shirt was made from a woman's large top and was not pure cotton. It was also thinner material than I like. However, despite those two drawbacks, I really liked the colors and the pattern, so I went ahead and bought it. The cotton binding around the neckline and armholes help stabilize it, but in all honesty, it would probably have been better if I had reversed the colors and used the patterned piece on the bottom and the heavier cotton T-shirt material for the yoke. I just didn't have enough of the patterned piece to do that.
I hope these posts about recycling clothing inspires you do give it a try, with the understanding that not everyone wants to bother with beading and stenciling, or may not know how to sew. But trust me, there are tons of garments out there that need nothing more that a really good cleaning (I run my finds through the wash twice). As an example, the patterned shirt I used for the yoke could have been worn "as is" with the kimono and it would have looked fantastic...all for less than $10. And remember, check out the pajama section at any used clothing store or the Goodwill. I have found some really nice kimono-type coverups there for around $4.99 or less.
For this project I used one man's XXL T-shirt and one size large woman's shirt bought from the Goodwill. For the binding around the neck and armholes I cut strips from an old tank top of mine. Then I went through my stash of Goodwill kimonos to see if I had anything that would match. Bingo. Then I topped it off with a necklace I made years ago. All-in-all, it makes for a pretty nice outfit.
Here are the details.
Simplicity pattern 1463 (view D modified by me), stencil, Tulip Soft Cover fabric paint in Dusty Rose, pink bugle beads and purple seed beads, J & P Coats embroidery thread in a dusky rose (it was an old skein I'd had for years, with no color numbers on the sleeve)
Beads are sewn on with a back stitch using regular sewing thread doubled. These beads all had holes large enough that I could use a regular sewing needle instead of a beading needle. This made me VERY happy, as beading needles are a pain in the rear to thread. Well...for me, anyway.
The binding was hand sewn on with embroidery thread using a fly stitch. I cut strips 1 1/4" wide with a rotary cutter, then fold the strips in half the long way and iron them. This gives me the equivalent of bias tape, and I use the strips in exactly the same way.
One of the places I modify the pattern is to round off the neckline instead of leaving it a V. This makes it easier to sew the binding on.
Normally I avoid buying shirts with pockets, as it cuts down the amount of fabric I can use, but I liked the color of this shirt, and it was an XXL, so I had plenty to work with.
The back is also where I do a bit of altering from the pattern. When laying out the pieces, I add width to the center back (About two-three inches). I can get more gathers that way, which makes the lower part of the shirt hang a little nicer.
Next I added the Liz Claiborne kimono I had found last summer in the pajama section at the Goodwill. It is a great example of the kinds of things you can find that don't need any customizing or sewing...just a good wash.
The necklace was made from vintage navettes (the diamond shaped dangles) I bought years ago on Ebay, pieces of a vintage chain necklace that had belonged to my husband's grandmother, but was broken, and some beads from my stash. The center "jewel" is an old chandelier crystal.
A few notes.
The yoke on this shirt was made from a woman's large top and was not pure cotton. It was also thinner material than I like. However, despite those two drawbacks, I really liked the colors and the pattern, so I went ahead and bought it. The cotton binding around the neckline and armholes help stabilize it, but in all honesty, it would probably have been better if I had reversed the colors and used the patterned piece on the bottom and the heavier cotton T-shirt material for the yoke. I just didn't have enough of the patterned piece to do that.
I hope these posts about recycling clothing inspires you do give it a try, with the understanding that not everyone wants to bother with beading and stenciling, or may not know how to sew. But trust me, there are tons of garments out there that need nothing more that a really good cleaning (I run my finds through the wash twice). As an example, the patterned shirt I used for the yoke could have been worn "as is" with the kimono and it would have looked fantastic...all for less than $10. And remember, check out the pajama section at any used clothing store or the Goodwill. I have found some really nice kimono-type coverups there for around $4.99 or less.
Labels:
beading,
Goodwill,
recycled style,
stenciling,
T-shirts,
used clothing
Thursday, June 27, 2019
Vintage Belt Buckle Necklace & Earrings
I have had this vintage belt buckle forever...bought it back in the early 80s at an antique roadshow kinda thing. I think I paid $5.00 for it. Originally I planned to make a belt to go with it, but for a variety of reasons the project always got bumped to the back burner while I worked on something else.
When I came across the dark green beads that were the exact same color as the glass jewel in the belt, I remembered my old neglected friend. After bringing it back to the light of day and really looking it over, I decided a necklace would be a better way to use the buckle. Another reason for this decision was that the actual buckle link on the back of the piece looked like pot metal soldered on to the front. After years of use, and being very slightly bent, I was not sure it could have taken the strain of remaking it into a belt.
After playing around with different ideas, in the end I decided to keep it simple and let the vintage buckle be the focal point.
Vintage Belt Buckle Necklace and Earring Set
Vintage, and very possibly an antique, belt buckle, emerald green glass beads, clear glass beads, green aluminum jump rings, gold-tone double jump rings, and gold-tone wire.
This was the original thought...I had pieces from one of those bracelets made on stretchy nylon line that had broken. I was going to use the brass pieces along with the faceted clear beads. Pretty early on I eliminated the brass beads and spacers. They just didn't look right.
Finished necklace and earrings.
Closeup of buckle. The buckle opens behind the glass jewel, which is how the necklace is taken on and off.
This was a fun piece to make, and it was nice to finally be able to use this lovely buckle after having it sit in a drawer for so many decades, waiting for me to be inspired. I have worn this necklace a few times now, and always received a compliment or two.
When I came across the dark green beads that were the exact same color as the glass jewel in the belt, I remembered my old neglected friend. After bringing it back to the light of day and really looking it over, I decided a necklace would be a better way to use the buckle. Another reason for this decision was that the actual buckle link on the back of the piece looked like pot metal soldered on to the front. After years of use, and being very slightly bent, I was not sure it could have taken the strain of remaking it into a belt.
After playing around with different ideas, in the end I decided to keep it simple and let the vintage buckle be the focal point.
Vintage Belt Buckle Necklace and Earring Set
Vintage, and very possibly an antique, belt buckle, emerald green glass beads, clear glass beads, green aluminum jump rings, gold-tone double jump rings, and gold-tone wire.
This was the original thought...I had pieces from one of those bracelets made on stretchy nylon line that had broken. I was going to use the brass pieces along with the faceted clear beads. Pretty early on I eliminated the brass beads and spacers. They just didn't look right.
Finished necklace and earrings.
Closeup of buckle. The buckle opens behind the glass jewel, which is how the necklace is taken on and off.
This was a fun piece to make, and it was nice to finally be able to use this lovely buckle after having it sit in a drawer for so many decades, waiting for me to be inspired. I have worn this necklace a few times now, and always received a compliment or two.
Labels:
beading,
jewelry,
recycle,
vintage adaptation,
wire work
Wednesday, June 5, 2019
Recycled Style
In an effort to promote recycling, periodically I am going to post photos of how I put together clothes picked up mainly at the Goodwill, but also at secondhand clothing shops, and antique/junk shops. I hope this will inspire others to try doing the same, since the garment industry is one of the top ten polluters in the world. There are literally millions of garments and accessories out there waiting to be reused. Most take nothing more than a good wash, or minimal mending. Following the photos are some tips on what to look for and what to avoid, and some of the mistakes I have made.
If you are creative, like me, the possibilities are endless. Here is an example.
The shirt was made from two mens XXXL T-shirts, using Simplicity pattern #1463 that I slightly modified. The neck and armhole bindings are strips of T-shirt sewn on with embroidery thread using a fly stitch. The front of the shirt was stenciled and beaded (beaded backstitch) before the shirt was sewn up. I added the beads to the neckline months later.
The necklace is one I made from a broken vintage bracelet found for about $5 at an antique mall.
Months later I was trolling through the pajama and nightgown section of our local Goodwill and found this kimono. It was a perfect match and all I had to do was wash it.
This is just one example of how I put things together. Recycling is fun, even if all you do is wash the garment and wear it. I have found lovely linen jackets, silk shirts, denim jackets, and I even found a beautiful, butter-soft black leather jacket for only $24.00.
Here are some tips, and some of the mistakes I've made. Keep in mind, some trips to the Goodwill or secondhand shops I have come out with nothing. Other times I score big time...like the leather jacket.
Read the labels, if they are still attached. It will tell you the fabric content, size, and the washing instructions. Some garments have had the labels cut out, which I find frustrating. I stick with natural fabrics, mostly cotton and linen.
On size. I wear shirts medium to large, depending on the style (I have wide shoulders). Be careful! Some places, including our local Goodwill store, do not separate junior sizes from adult sizes. I tend to eyeball a shirt by holding it up to me and seeing if the shoulder seams are in the right place. This has tricked me a few times. When I get the shirt home and try it on, the underarms are way too tight, and the shirt fits too snug. Junior medium. Lesson learned.
Look for holes in the fabric. Some can be really tiny. Look for stains and pass these garments by, unless you can cut them up and use the fabric on something else (I do this every now and then), as most of the time the stains will not come out.
Try to get a feel for natural fabrics, which will help when the labels are missing from the garment. Just this week I came home with what I thought was a thin cotton, but no label. Washed it and the top shrunk up to doll clothes size. With this particular top, I won't even use it for appliqués, as I have no idea how much further it will shrink. The top already had a couple of tiny holes along the bottom front, and the sales lady just gave me the shirt since she couldn't sell it once she realized it had holes in it, so at least I wasn't out any money on that one. Too bad, 'cause the shirt was really pretty.
This may sound gross, but sniff the shirt, especially the underarms. Some odors never wash out. If you smell anything, pass it by.
If you know how to sew, you can use mens XXXL T-shirts as flat fabric (which is what I did with the shirt in the photos). Cut the sleeves off, but save them if you do appliqués. Cut along ONE side seam and both shoulder seams. After you do that, you can lay the fabric out flat and lay on your patterns. Here is a photo taken out in my garage where my big work table is. As you can see, you end up with a pretty good hunk of fabric. I try to buy shirts with no front pockets, no logos or designs, and all pure cotton.
So there you have it, for this time. Recycling is fun, a good way to save a lot of money on clothes, and a wonderful way to stem the tide of pollution. For creative types, there is even more fun with stitching, beading, stenciling, appliqués, reverse appliqués, embroidery, and customizing patterns. For more examples of stenciled, beaded, and appliquéd shirts, see my previous post.
Enjoy! You can save a ton of money and still be styling it!
If you are creative, like me, the possibilities are endless. Here is an example.
The shirt was made from two mens XXXL T-shirts, using Simplicity pattern #1463 that I slightly modified. The neck and armhole bindings are strips of T-shirt sewn on with embroidery thread using a fly stitch. The front of the shirt was stenciled and beaded (beaded backstitch) before the shirt was sewn up. I added the beads to the neckline months later.
The necklace is one I made from a broken vintage bracelet found for about $5 at an antique mall.
Months later I was trolling through the pajama and nightgown section of our local Goodwill and found this kimono. It was a perfect match and all I had to do was wash it.
This is just one example of how I put things together. Recycling is fun, even if all you do is wash the garment and wear it. I have found lovely linen jackets, silk shirts, denim jackets, and I even found a beautiful, butter-soft black leather jacket for only $24.00.
Here are some tips, and some of the mistakes I've made. Keep in mind, some trips to the Goodwill or secondhand shops I have come out with nothing. Other times I score big time...like the leather jacket.
Read the labels, if they are still attached. It will tell you the fabric content, size, and the washing instructions. Some garments have had the labels cut out, which I find frustrating. I stick with natural fabrics, mostly cotton and linen.
On size. I wear shirts medium to large, depending on the style (I have wide shoulders). Be careful! Some places, including our local Goodwill store, do not separate junior sizes from adult sizes. I tend to eyeball a shirt by holding it up to me and seeing if the shoulder seams are in the right place. This has tricked me a few times. When I get the shirt home and try it on, the underarms are way too tight, and the shirt fits too snug. Junior medium. Lesson learned.
Look for holes in the fabric. Some can be really tiny. Look for stains and pass these garments by, unless you can cut them up and use the fabric on something else (I do this every now and then), as most of the time the stains will not come out.
Try to get a feel for natural fabrics, which will help when the labels are missing from the garment. Just this week I came home with what I thought was a thin cotton, but no label. Washed it and the top shrunk up to doll clothes size. With this particular top, I won't even use it for appliqués, as I have no idea how much further it will shrink. The top already had a couple of tiny holes along the bottom front, and the sales lady just gave me the shirt since she couldn't sell it once she realized it had holes in it, so at least I wasn't out any money on that one. Too bad, 'cause the shirt was really pretty.
This may sound gross, but sniff the shirt, especially the underarms. Some odors never wash out. If you smell anything, pass it by.
If you know how to sew, you can use mens XXXL T-shirts as flat fabric (which is what I did with the shirt in the photos). Cut the sleeves off, but save them if you do appliqués. Cut along ONE side seam and both shoulder seams. After you do that, you can lay the fabric out flat and lay on your patterns. Here is a photo taken out in my garage where my big work table is. As you can see, you end up with a pretty good hunk of fabric. I try to buy shirts with no front pockets, no logos or designs, and all pure cotton.
So there you have it, for this time. Recycling is fun, a good way to save a lot of money on clothes, and a wonderful way to stem the tide of pollution. For creative types, there is even more fun with stitching, beading, stenciling, appliqués, reverse appliqués, embroidery, and customizing patterns. For more examples of stenciled, beaded, and appliquéd shirts, see my previous post.
Enjoy! You can save a ton of money and still be styling it!
Labels:
beading,
Goodwill,
jewelry,
recycled T-shirts,
recycling,
stenciling
Thursday, May 23, 2019
Mandala Stenciled, Beaded, Stitched T-shirt II
This is the second mandala shirt I have done, and I really like the way they have both turned out. Here is a pictorial essay on the process, and at the end some tips to keep in mind if you would like to try this process on your own.
All these projects are done on Goodwill T-shirts, and the stenciled appliqués are other Goodwill shirts cut up for fabric.
Picking the colors. You can see I have already stenciled the first layer. Paint color here is Dioxazine Purple acrylic by Americana. Try to chose harmonious color combinations, as the beading adds a lot of eye-candy to the fabric and you want that to be the focus.
Next, set up the layers on the garment T-shirt. I use large safety pins for this. Be sure to center the design, which can be a bit tricky on shirts that have been worn as many times as these. The knit has usually warped or twisted to a certain degree. Get it as close as you can. I tend to eyeball it, step back, and eyeball it again until I think it is good to go.
Then the fun begins. The beading. I used regular sewing thread, and whatever needle will fit the beads I am using. Test the beads after the needle is threaded, as some will go over the needle, but not over the extra bulk of the thread. Keep in mind the intricacy of the design, and don't get beads that are too large or too small. I use a standard, easy-peasy back stitch for beading. Once the beading is done, I do a running stitch just to the outside of the stencil. In this case, at each point of the mandala I added a blue bead. Stitching this way keeps the material from rolling back over the beads.
In this photo you can see how the knit is rolling toward the front. I got this one on backwards so had to deal with it. Also, as in this case, it looked like the knit was going to roll the other way, and then the more I worked with it, the more it changed. Bottom line, don't sweat over it.
Next is to unpin and trim away the top (in this case rose colored) fabric, leaving about a 1/4" margin. Be careful not to cut into your running stitches, or the fabric underneath.
Re-pin the bottom layer and do another running stitch around the edge, again 1/4" margin. When finished, unpin the fabric and trim away the excess, 1/4" away from the running stitches. Again, being VERY careful not to cut into the running stitches or the shirt.
Lastly, in this design, I add a charm in the center. This can be anything from a larger bead, a button, or charm.
At this point, you are done! And just remember, this is meant to look handmade, not like some mass-produced piece from China. Small imperfections are not the end of the world.
Here are a few tips and suggestions for stenciling and beading on fabric.
I use shirts from the Goodwill in an effort to recycle rather than buy new. The garment industry is one of the most heavily polluting in the world. Not only do I buy the base T-shirt, but also I buy XXXL mans shirts to cut up for flat fabric. The purple on this shirt was just the sleeve from one of those large shirts. I double wash everything before using.
Stencils can be found everywhere. There are literally hundreds to choose from. To start, pick something simple. Also, I like to leave sections of the stencil un-beaded as part of the whole design.
Beads are sold everywhere or can be ordered online. JoAnn's and Craft Warehouse are good sources. Online, Fire Mountain Gems and Beads will overwhelm you with choices. The size of the bead should be in relation to how complicated the stencil design is. Also, if your beads are really small, you will need to use a beading needle. I use a size 13. Anything smaller makes me crazy trying to thread it.
When setting out the layers, check to see which way the knit tends to roll, then face that toward the main shirt. With this kind of work, it isn't super important whether you use the right or wrong side of the fabric, so if the knit curls toward the right side, put that side face down. This keeps the knit, after you have washed it a few times, from rolling over the stitching.
As for paint, I have used fabric paint, craft paint, and my regular acrylic paints...all acrylic based, so easy to clean up and fast drying. I dab them on with small makeup sponges available at any cosmetic counter. I leave the piece to dry overnight and that has worked out just fine.
Note: I tried a thick glitter paint once. Once. It was a nightmare to get in the stencil and didn't cover very well. When the project was finished, I threw the paint away! I have used metallic paint with great success, though. Next I want to experiment with fabric spray paint!
Here are a few photos of previous projects I have done. I love beading and stitching over stencils. I was my way of solving the problem of how to get an intricate pattern design on fabric that wouldn't rub off before the beading was done. I get things laid out, cue up Pandora, and zone out.
The above piece is also reverse appliqué.
Enjoy...it is as fun as it is addicting.
If you have any questions, please feel free to comment.
All these projects are done on Goodwill T-shirts, and the stenciled appliqués are other Goodwill shirts cut up for fabric.
Picking the colors. You can see I have already stenciled the first layer. Paint color here is Dioxazine Purple acrylic by Americana. Try to chose harmonious color combinations, as the beading adds a lot of eye-candy to the fabric and you want that to be the focus.
Next, set up the layers on the garment T-shirt. I use large safety pins for this. Be sure to center the design, which can be a bit tricky on shirts that have been worn as many times as these. The knit has usually warped or twisted to a certain degree. Get it as close as you can. I tend to eyeball it, step back, and eyeball it again until I think it is good to go.
Then the fun begins. The beading. I used regular sewing thread, and whatever needle will fit the beads I am using. Test the beads after the needle is threaded, as some will go over the needle, but not over the extra bulk of the thread. Keep in mind the intricacy of the design, and don't get beads that are too large or too small. I use a standard, easy-peasy back stitch for beading. Once the beading is done, I do a running stitch just to the outside of the stencil. In this case, at each point of the mandala I added a blue bead. Stitching this way keeps the material from rolling back over the beads.
In this photo you can see how the knit is rolling toward the front. I got this one on backwards so had to deal with it. Also, as in this case, it looked like the knit was going to roll the other way, and then the more I worked with it, the more it changed. Bottom line, don't sweat over it.
Re-pin the bottom layer and do another running stitch around the edge, again 1/4" margin. When finished, unpin the fabric and trim away the excess, 1/4" away from the running stitches. Again, being VERY careful not to cut into the running stitches or the shirt.
Lastly, in this design, I add a charm in the center. This can be anything from a larger bead, a button, or charm.
Here are a few tips and suggestions for stenciling and beading on fabric.
I use shirts from the Goodwill in an effort to recycle rather than buy new. The garment industry is one of the most heavily polluting in the world. Not only do I buy the base T-shirt, but also I buy XXXL mans shirts to cut up for flat fabric. The purple on this shirt was just the sleeve from one of those large shirts. I double wash everything before using.
Stencils can be found everywhere. There are literally hundreds to choose from. To start, pick something simple. Also, I like to leave sections of the stencil un-beaded as part of the whole design.
Beads are sold everywhere or can be ordered online. JoAnn's and Craft Warehouse are good sources. Online, Fire Mountain Gems and Beads will overwhelm you with choices. The size of the bead should be in relation to how complicated the stencil design is. Also, if your beads are really small, you will need to use a beading needle. I use a size 13. Anything smaller makes me crazy trying to thread it.
When setting out the layers, check to see which way the knit tends to roll, then face that toward the main shirt. With this kind of work, it isn't super important whether you use the right or wrong side of the fabric, so if the knit curls toward the right side, put that side face down. This keeps the knit, after you have washed it a few times, from rolling over the stitching.
As for paint, I have used fabric paint, craft paint, and my regular acrylic paints...all acrylic based, so easy to clean up and fast drying. I dab them on with small makeup sponges available at any cosmetic counter. I leave the piece to dry overnight and that has worked out just fine.
Note: I tried a thick glitter paint once. Once. It was a nightmare to get in the stencil and didn't cover very well. When the project was finished, I threw the paint away! I have used metallic paint with great success, though. Next I want to experiment with fabric spray paint!
Here are a few photos of previous projects I have done. I love beading and stitching over stencils. I was my way of solving the problem of how to get an intricate pattern design on fabric that wouldn't rub off before the beading was done. I get things laid out, cue up Pandora, and zone out.
The above piece is also reverse appliqué.
Enjoy...it is as fun as it is addicting.
If you have any questions, please feel free to comment.
Labels:
appliqué,
beading,
Goodwill T-shirts,
recycling,
reverse applique.,
stenciling,
stitching
Subscribe to:
Posts (Atom)