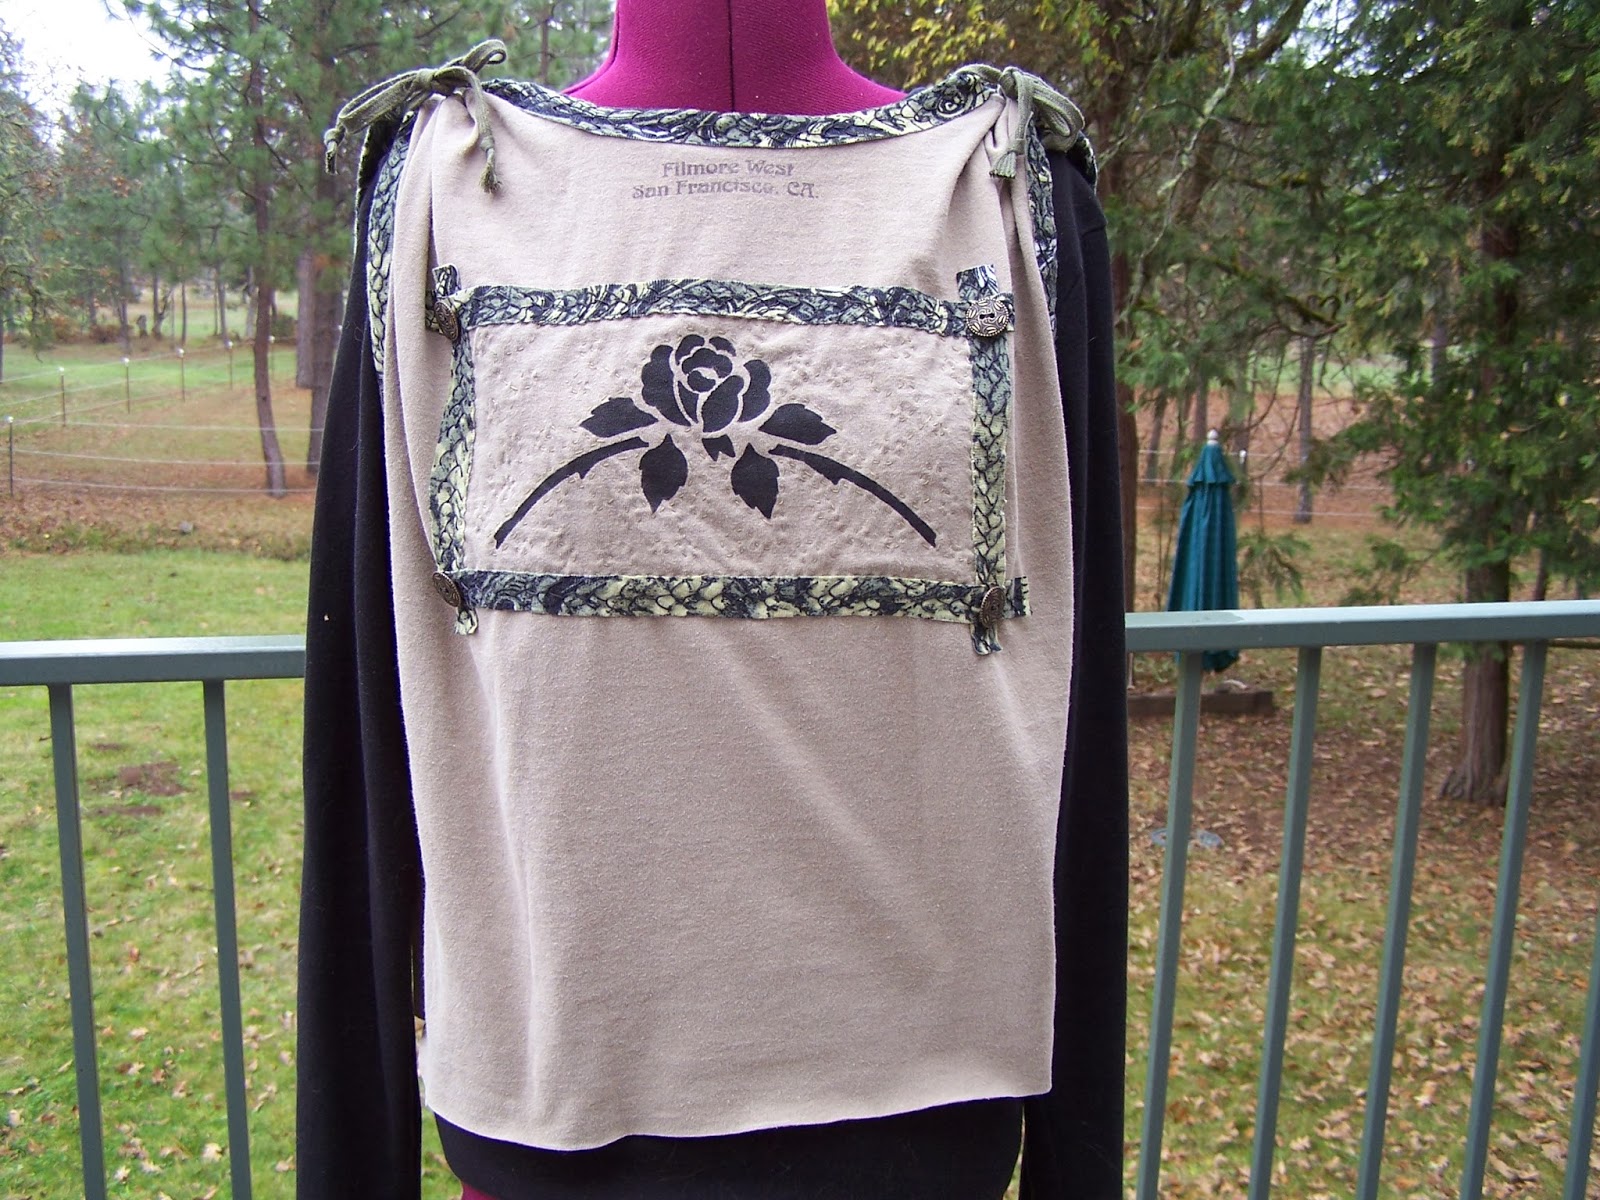
If there is one thing this project taught me, it was patience, 'cause things kinda went wonky as the work proceeded. Biggest frustration was sewing on the narrow banding that frames the black rose panel. Those long strips of knit fabric, despite being pinned to the fabric every inch(which caused another nightmare, as the thread was always getting hung up on the pins as I worked), walked, skooched, wriggled, and worm-crawled with every stitch. Then, after they were all finally locked down (I gave up trying to make them ruler-straight), the panel fabric started to pull loose and curl out from underneath the framing strips. First I tried doing a small running stitch around the inside edge of framing strips, trying to stabilise the panel fabric underneath. That helped...sorta...but didn't solve the problem. So, I added a running stitch all around the edge of the panel fabric. Again, it helped, but the problem never got totally solved. I suspect the first time I wash this, the two pieces will pull slightly apart and show the raw edges. At this point, I don't care. I decided it could just be part of plan...yeah...plan...at least, that's my story and I'm sticking to it.
Center panel partly top-stitched, and the framing strips pinned in place.
This was also one of those projects where the original design idea got changed as I went along. Pretty much each time I tried the top on I tweaked something. The last change I made was to cut off about five inches from the bottom, rather than gather up the sides, as I had planned. That was another situation where, standing in front of a full-length mirror and playing around with the shirt while on, made me decide it looked way better shorter, than just gathered. Whack...off with the five inches.
What would I do differently? For one thing, I would iron the center panel and framing strips onto Heat and Bond to stabilise them, iron them onto the shirt, then do the top stitching. It would solve that whole curling, walking, and pulling away problem and make my life much easier for next time. Also, in looking at the stitching around the rose, which I did in free-form swirl patterns trying to match the swirls in the binding material, instead I think I would just do the running stitches to echo the outline of the rose. As it is now, you can't really see the swirl pattern. It just looks like random quilting stitches that don't make any sense. Lastly I would make the shoulders narrower, so there would be less fabric bunched up under the ties.
Purposely, there are no beads or sequins on this top. Just the four buttons, which I found while looking for something else in my button stash, and thought they would work well with this. I wanted this top to be different in look and feel from the other altered tops I have done. Less glitz, more hardcore. For whatever reason, I think it has a vaguely military aura about it. Maybe it's the colors, and the fact that the swirl pattern looks a bit like camo? Not sure, but I'm okay with it. In fact, I like it a lot.
Here is the finished top on Inara. Under it is a plain black long-sleeved T-shirt, which is how I will wear it during the winter. With tank tops under it during the summer.
Materials list: Two mans T-shirts from the Goodwill, one rose stencil from the Goodwill, knit tie cord from an old hoodie, four buttons from my stash, button/craft thread, regular all-purpose thread.
"To live in the world without becoming aware of the meaning of the world is like wandering about in a great library without touching the books.".....The Secret Teachings of All Ages
"Neither aesthetics nor money-spent make a good studio-it's what you make inside it that really counts"...Shanna Van Maurice, artist.
Showing posts with label altered clothing. Show all posts
Monday, November 11, 2013
Tuesday, November 5, 2013
Filmore West Top
I found this T-shirt with the "Filmore West " name on the back, and I assume what was a fairly Hippy-esque design on the front but was so faded I wasn't sure. My first thought was, could this T-shirt actually have survived in someones attic since the 60s-70s? Probably not, but the idea was intriguing. Anyway, when I saw it, hanging in the forlorn ranks of other cast off shirts at the Goodwill, I had a flashback to my own Hippy days—painted clothes, painted face, lots of beads, freakout dances with giant pulsing blobs projected on the walls—you know, all the fun stuff. At the time, I never made it to San Francisco or the Filmore where all the hot bands played, and by the time I graduated from High School it was being touted that the age of the Flower Child was already dead. But still, I found this silly T-shirt that brought back a lot of silly, and I'll be honest also scary, memories. For $2.00 I bought it, with no clue what I was going to do with it.
Then, not long ago, I came across another Goodwill shirt with a swirly design that I liked. It was also only about $2.99, so I bought that one.
Add to this progression the fact that I recently caved and started a Pinterest page, with lots of boards full of ideas, and we get to this current project, which is a bit different from the things I have done so far.
Here are the two shirts I am using. First decision I made was to ignore the design on the front of the Filmore shirt and make the back of the shirt the front. I have already cut the sleeves off the Filmore shirt.
I put the Filmore shirt on Inara (my dress form) and started playing around with draping, which I had never done before. At one point I basted in tucks around the waist and put pleats across the shoulder seams, but when I tried it on, I didn't like the way the shirt hung and knew if I kept it that way, I would never wear it. So, I ripped out all the basting and tried just tying the shoulder seems to get the drape. That worked a lot better. With that idea in mind, after cutting the neckline a bit lower, I cut binding from the patterned shirt and sewed that to the neck and armholes of the Filmore shirt. Instead of using embroidery thread to sew on the binding, I used doubled button/craft thread, which I actually liked working with better than the embroidery thread. Unfortunately, it comes in a limited choice of colors. I used the button thread because it's not as bulky, and I didn't want the stitching to obliterate or distract from the pattern on the shirt. As it turned out, from only a short distance, the thread disappears.
The front of the shirt was going to need some sort of design, but I didn't have anything that really look "Hippy" and in any case, I didn't want to go that way. I wanted something more urban, rock, or punk rather than Hippy or "crafty." I wanted edgy. Which made me remember the stencil of a rose I also bought at the Goodwill, for only a dollar.
On one of the cutoff sleeves I stenciled the rose, in black. The rose will be cut out in a rectangle (you can just see the lines drawn with soap on the material), and then bordered with the patterned shirt material. The whole piece will be appliqued onto the front of the Filmore shirt.
After I got all the binding sewn on, I tied up the shoulder seams with a piece of cord I found in my stash of stuff, in a color that worked, and tried the shirt on again. I liked it, and knew the applique of the rose would work great. While I was still standing in front of the mirror, I hiked up the sides in preparation for taking the shirt off, and stopped. I really liked the way the shirt draped when I pulled up the sides just a bit. That will be the last thing I do to finished the top. This is meant to be layered over other shirts, as the armholes are a bit big and would show my bra if I wore it alone. Which is fine, because I originally wanted it to be something I could layer.
So, that's the Filmore West Top—so far. This should go together pretty fast, and since the weather is rainy and cold, I'll have lots of time to work on it.
Then, not long ago, I came across another Goodwill shirt with a swirly design that I liked. It was also only about $2.99, so I bought that one.
Add to this progression the fact that I recently caved and started a Pinterest page, with lots of boards full of ideas, and we get to this current project, which is a bit different from the things I have done so far.
Here are the two shirts I am using. First decision I made was to ignore the design on the front of the Filmore shirt and make the back of the shirt the front. I have already cut the sleeves off the Filmore shirt.
I put the Filmore shirt on Inara (my dress form) and started playing around with draping, which I had never done before. At one point I basted in tucks around the waist and put pleats across the shoulder seams, but when I tried it on, I didn't like the way the shirt hung and knew if I kept it that way, I would never wear it. So, I ripped out all the basting and tried just tying the shoulder seems to get the drape. That worked a lot better. With that idea in mind, after cutting the neckline a bit lower, I cut binding from the patterned shirt and sewed that to the neck and armholes of the Filmore shirt. Instead of using embroidery thread to sew on the binding, I used doubled button/craft thread, which I actually liked working with better than the embroidery thread. Unfortunately, it comes in a limited choice of colors. I used the button thread because it's not as bulky, and I didn't want the stitching to obliterate or distract from the pattern on the shirt. As it turned out, from only a short distance, the thread disappears.
The front of the shirt was going to need some sort of design, but I didn't have anything that really look "Hippy" and in any case, I didn't want to go that way. I wanted something more urban, rock, or punk rather than Hippy or "crafty." I wanted edgy. Which made me remember the stencil of a rose I also bought at the Goodwill, for only a dollar.
On one of the cutoff sleeves I stenciled the rose, in black. The rose will be cut out in a rectangle (you can just see the lines drawn with soap on the material), and then bordered with the patterned shirt material. The whole piece will be appliqued onto the front of the Filmore shirt.
After I got all the binding sewn on, I tied up the shoulder seams with a piece of cord I found in my stash of stuff, in a color that worked, and tried the shirt on again. I liked it, and knew the applique of the rose would work great. While I was still standing in front of the mirror, I hiked up the sides in preparation for taking the shirt off, and stopped. I really liked the way the shirt draped when I pulled up the sides just a bit. That will be the last thing I do to finished the top. This is meant to be layered over other shirts, as the armholes are a bit big and would show my bra if I wore it alone. Which is fine, because I originally wanted it to be something I could layer.
So, that's the Filmore West Top—so far. This should go together pretty fast, and since the weather is rainy and cold, I'll have lots of time to work on it.
Monday, July 1, 2013
Belle Epoque Tunic — Completed
After hours and hours of pleasurable beading, and adding the front decoration to the bodice, the tunic is now finished. Well, except for the buttons, which are boring, but I don't have anything to replace them that would work. I will keep an eye out, and when I find something, will swap them out.
I didn't bead the arm binding, as I thought it might be pretty scratchy on my underarms. The center decoration was made up of a scrap from the shirt, purple binding, beads, and an iron-on peacock feather that was one of several in a package I bought at JoAnn Fabrics.
The skirt hem beading.
Waist band, with double row of fly stitch and beads.
So, this project went from this = The inspiration.
To this = The materials (All from the Goodwill)
To this = The finished tunic.
I still wish I had been able to add the short sleeves, so if I do another one of these, I will make sure I have enough fabric to do that. Also, I may do the whole tunic out of T-shirt material rather than another cotton shirt, just to see how each one moves and hangs differently. Another tweak I may do, is not raise the front part of the waist. My fear is, the way I have it now, will make me look pregnant! NOT GOOD. I am wearing it today when I run into town to do errands, so will know better how everything works by the time I get home. If anyone asks me, "When are you due?", after being horrified, it will be my sign that something must be changed!
So, now it's on to the next project. I have an idea I want to try, using stencils on a T-shirt. Also, my Etsy jewelry shop has been closed for several months, while I decided in what direction I wanted to go, and to give me time to upgrade my stock, and take better photos. I need to get busy on that, and have several jewelry projects in mind that need to get made. With the temperatures hanging between 95 and 103 inside projects are a good thing!
I didn't bead the arm binding, as I thought it might be pretty scratchy on my underarms. The center decoration was made up of a scrap from the shirt, purple binding, beads, and an iron-on peacock feather that was one of several in a package I bought at JoAnn Fabrics.
The skirt hem beading.
Waist band, with double row of fly stitch and beads.
So, this project went from this = The inspiration.
To this = The materials (All from the Goodwill)
To this = The finished tunic.
I still wish I had been able to add the short sleeves, so if I do another one of these, I will make sure I have enough fabric to do that. Also, I may do the whole tunic out of T-shirt material rather than another cotton shirt, just to see how each one moves and hangs differently. Another tweak I may do, is not raise the front part of the waist. My fear is, the way I have it now, will make me look pregnant! NOT GOOD. I am wearing it today when I run into town to do errands, so will know better how everything works by the time I get home. If anyone asks me, "When are you due?", after being horrified, it will be my sign that something must be changed!
So, now it's on to the next project. I have an idea I want to try, using stencils on a T-shirt. Also, my Etsy jewelry shop has been closed for several months, while I decided in what direction I wanted to go, and to give me time to upgrade my stock, and take better photos. I need to get busy on that, and have several jewelry projects in mind that need to get made. With the temperatures hanging between 95 and 103 inside projects are a good thing!
Thursday, June 13, 2013
Belle Epoque Tunic — Process
Here are process photos of the BE tunic I am making. The tunic is done, except for the beading, and the small applique that will go on the front of the bodice.
The inspiration, and the elements laid out.
The bodice cut out, and the lower part of the man's cotton shirt cut off just below the sleeves. I also cut the narrow hem off the bottom of the shirt, since I intended to add purple binding as a finish.
The tunic sewn together, and the purple binding sewn on with fly-stitch (or fern-stitch, I've seen it called either one). The cotton skirt was basted to the bodice with a running stitch, and instead of gathers, I made pleats to take in the fullness. I pinned the purple binding around the waist, to see how it looked, decided I liked it, but made it a bit narrower.
Also, I had intended for it to have short sleeves, but there wasn't enough of the gray T-shirt to make them, and I didn't want them in purple, so the tunic ended up sleeveless.
The tunic laid out on my coffee table (better lighting...sorta). I have almost finished beading the waist band, which was sewn down with a double row of fly-stitch. Next to bead will be the neckline, armholes, and the bottom of the skirt. Yeah...lots of beading. But I love the heft the garment takes on the more beads I add, and I like the clicking sound the beaded parts make against the table as I work on the piece. The beads are tiny matte-finished silver, AB dark purple, and larger lozenge beads in dark purple with blue glints. Embroidery floss is gunmetal gray a shade lighter than the bodice.
I'm going to either swap out the buttons for others, or sew beads to the existing buttons. Not sure which. And I think I am going to hand-sew down the front of the skirt, so it doesn't gap in between the buttons. I'm never going to unbutton it, so might as well close it nicely. Probably with a running stitch in the gray floss. In the last photo it looks as if there is a stain on the right side of the skirt, but it's just shadows.
The more I work on this tunic, the better I like it. Wasn't too in love with it at first. I wondered if all the beading I was doing would be for naught...but no, as it goes along, the piece grows on me. I'll see how I feel when the applique is on, and the beading is finished. I may love it by then. One can only hope.
The inspiration, and the elements laid out.
The bodice cut out, and the lower part of the man's cotton shirt cut off just below the sleeves. I also cut the narrow hem off the bottom of the shirt, since I intended to add purple binding as a finish.
The tunic sewn together, and the purple binding sewn on with fly-stitch (or fern-stitch, I've seen it called either one). The cotton skirt was basted to the bodice with a running stitch, and instead of gathers, I made pleats to take in the fullness. I pinned the purple binding around the waist, to see how it looked, decided I liked it, but made it a bit narrower.
Also, I had intended for it to have short sleeves, but there wasn't enough of the gray T-shirt to make them, and I didn't want them in purple, so the tunic ended up sleeveless.
The tunic laid out on my coffee table (better lighting...sorta). I have almost finished beading the waist band, which was sewn down with a double row of fly-stitch. Next to bead will be the neckline, armholes, and the bottom of the skirt. Yeah...lots of beading. But I love the heft the garment takes on the more beads I add, and I like the clicking sound the beaded parts make against the table as I work on the piece. The beads are tiny matte-finished silver, AB dark purple, and larger lozenge beads in dark purple with blue glints. Embroidery floss is gunmetal gray a shade lighter than the bodice.
I'm going to either swap out the buttons for others, or sew beads to the existing buttons. Not sure which. And I think I am going to hand-sew down the front of the skirt, so it doesn't gap in between the buttons. I'm never going to unbutton it, so might as well close it nicely. Probably with a running stitch in the gray floss. In the last photo it looks as if there is a stain on the right side of the skirt, but it's just shadows.
The more I work on this tunic, the better I like it. Wasn't too in love with it at first. I wondered if all the beading I was doing would be for naught...but no, as it goes along, the piece grows on me. I'll see how I feel when the applique is on, and the beading is finished. I may love it by then. One can only hope.
Monday, June 3, 2013
Is It Altered, Embellished, Or Upcycled?
I was flipping through the latest issue of Altered Couture magazine the other day, and after viewing the clothing inside, decided that, for me, there is a a big difference between something that has been altered, and something that has been merely embellished. And before I spill out my two-pence worth, let me state that this is just my personal opinion. I'm sure there are lots of people out there who will disagree, but hey, my blog, my thoughts.
Using the term "couture" implies that whatever altering done to the garment should be high quality, show that a lot of thought, effort, and planning went into it, and the end result looks "right." I can't define "right" but I know it when I see it (accepting that "right" for me might not be "right" for someone else). All the changes and additions come together in a cohesive way and it all just works. Even funky, which is not my thing, needs to have some rhyme or reason to the design. When done correctly, funky can be awesome (the work of Rice at the Voodoo Cafe comes instantly to mind). When done badly, funky looks messy and chaotic or just plain silly. The same could be said of bohemian, gypsy, modern, or any other style.
And this is where my inside voice goes "Seriously?" Taking a T-shirt and roughly hand-sewing a four-inch rectangle of tea-dyed muslin to the chest, and tacking on a six-inch length of flimsy old lace, off-center, to the bottom of said shirt, does not make it altered, and calling it couture is a real stretch. Taking a thrift store camisole and sewing on a couple of crochet doilies that dangle off the side is not altered, it is embellished, and in my not-worth-much opinion, it is embellishment done for the sake of a trend, rather than with much thought. The design makes no sense, and looks as if the doilies sort of stuck to the shirt by accident. The flip side of that is, I saw examples of outstanding garments done with lace and doilies. The designs work, the colors work, and the finished garments are beautiful.
If you are going to call a piece "altered couture" then the piece really should be altered in some significant way. There were many good examples of this in the magazine, some quite simple, so being altered doesn't imply that it has to be fancy, home-dyed, or covered with embellishments. It does mean, to me, that you have changed the shape and style of the original garment into something unique.
The word "upcycled" is used a lot lately, and I would agree that almost all of the items shown in the magazine were upcycled from thrift store finds or antique shop discoveries. This fact was stated over and over again by the people whose items were pictured. With the diversity of clothing, shoes, and accessories shown, and the fact that so many of them were decorated but not really altered, I think upcycled rather than altered, would be a better definition for many of the items pictured. Is a shoe you have painted really altered, or is it decorated? Yes, you have changed its appearance, but you haven't changed its shape. It's still the same shoe, just painted a different color, or with fabric and beads glued on. They have definitely been upcycled, and many of them are fantastic, but altered?
alter: v to make or become different; change. (Oxford Pocket American Dictionary)
According to the above definition, I guess all the items in the magazine were changed to a certain extent, so in the broadest sense of the term, they were altered. But add the word "couture" and it ups the anti to something beyond just upcycled, refurbished, or embellished. And yes, even the OPAD defines "couture" as merely "the design and manufacture of fashionable clothes = Haut couture." However, I still think it implies a higher quality of thought and design over and above a snip of muslin, a bit of old lace, or a doily hand sewn onto a thrift store T-shirt. But that's just my opinion...and you all know what that is worth, right?
Using the term "couture" implies that whatever altering done to the garment should be high quality, show that a lot of thought, effort, and planning went into it, and the end result looks "right." I can't define "right" but I know it when I see it (accepting that "right" for me might not be "right" for someone else). All the changes and additions come together in a cohesive way and it all just works. Even funky, which is not my thing, needs to have some rhyme or reason to the design. When done correctly, funky can be awesome (the work of Rice at the Voodoo Cafe comes instantly to mind). When done badly, funky looks messy and chaotic or just plain silly. The same could be said of bohemian, gypsy, modern, or any other style.
And this is where my inside voice goes "Seriously?" Taking a T-shirt and roughly hand-sewing a four-inch rectangle of tea-dyed muslin to the chest, and tacking on a six-inch length of flimsy old lace, off-center, to the bottom of said shirt, does not make it altered, and calling it couture is a real stretch. Taking a thrift store camisole and sewing on a couple of crochet doilies that dangle off the side is not altered, it is embellished, and in my not-worth-much opinion, it is embellishment done for the sake of a trend, rather than with much thought. The design makes no sense, and looks as if the doilies sort of stuck to the shirt by accident. The flip side of that is, I saw examples of outstanding garments done with lace and doilies. The designs work, the colors work, and the finished garments are beautiful.
If you are going to call a piece "altered couture" then the piece really should be altered in some significant way. There were many good examples of this in the magazine, some quite simple, so being altered doesn't imply that it has to be fancy, home-dyed, or covered with embellishments. It does mean, to me, that you have changed the shape and style of the original garment into something unique.
The word "upcycled" is used a lot lately, and I would agree that almost all of the items shown in the magazine were upcycled from thrift store finds or antique shop discoveries. This fact was stated over and over again by the people whose items were pictured. With the diversity of clothing, shoes, and accessories shown, and the fact that so many of them were decorated but not really altered, I think upcycled rather than altered, would be a better definition for many of the items pictured. Is a shoe you have painted really altered, or is it decorated? Yes, you have changed its appearance, but you haven't changed its shape. It's still the same shoe, just painted a different color, or with fabric and beads glued on. They have definitely been upcycled, and many of them are fantastic, but altered?
alter: v to make or become different; change. (Oxford Pocket American Dictionary)
According to the above definition, I guess all the items in the magazine were changed to a certain extent, so in the broadest sense of the term, they were altered. But add the word "couture" and it ups the anti to something beyond just upcycled, refurbished, or embellished. And yes, even the OPAD defines "couture" as merely "the design and manufacture of fashionable clothes = Haut couture." However, I still think it implies a higher quality of thought and design over and above a snip of muslin, a bit of old lace, or a doily hand sewn onto a thrift store T-shirt. But that's just my opinion...and you all know what that is worth, right?
Labels:
altered clothing,
clothes,
embellishment,
opinion
Wednesday, May 22, 2013
In The Meantime...The Linen/Lace Tank Top
I bought this linen tank top for $3.99 at the Goodwill (big surprise), knowing that I would do something with it, as it was a nice blank canvass. It's been in my closet, quietly waiting for me to make up my mind just what I would do to jazz it up a bit.
Enter Pinterest, with a major eye-candy bohemian/gypsy site, and the creative juices really started to percolate. I decided, after drooling over the clothing, rooms, and those amazing gypsy wagons, that there must be some residual hippie in me yet ( I graduated from High School in 1967). There were many clothing items decorated with lots of antique lace and beads. Shazzam! I've had a stash of old lace for a long time, so pulled out the linen tank, what lace I had, and started playing around.
Here is what I have decided on so far. I suspect more lace will be added to this tank as time goes on, especially around the bottom. But for now, I will sew this old lace yoke piece (given to me years ago by a friend) to the tank, then add beads and crystals. So much fun to be had by recycling stuff from the Goodwill. Warning...it is addictive once you start. You see possibilities EVERYWHERE!
Linen tank top and old lace blouse yoke.
This is how I will sew the lace to the tank. The narrow band at the top of the lace will be sewn down, but the lace below the band will be left loose. I think I will add crystals to the bottom of each lace point, to weight them down a bit, so they hang nicely.
Here are some closeups of the lace. I'm thinking of calling this the Gypsy Lace Tank. Sounds much more exotic and romantic than just Linen/Lace Tank Top.
And just for fun, here is a photo of my work table, which is in the garage, with both the Belle Epoch Short Dress, and the Linen/Lace Tank laid out, ready to start work on. Actually, I have already started on the Belle Epoch Short Dress, as the bottom of the shirt in the lower right has already been cut off. Please ignore the pile of couch throws waiting to be tossed in the washing machine. LOL
Enter Pinterest, with a major eye-candy bohemian/gypsy site, and the creative juices really started to percolate. I decided, after drooling over the clothing, rooms, and those amazing gypsy wagons, that there must be some residual hippie in me yet ( I graduated from High School in 1967). There were many clothing items decorated with lots of antique lace and beads. Shazzam! I've had a stash of old lace for a long time, so pulled out the linen tank, what lace I had, and started playing around.
Here is what I have decided on so far. I suspect more lace will be added to this tank as time goes on, especially around the bottom. But for now, I will sew this old lace yoke piece (given to me years ago by a friend) to the tank, then add beads and crystals. So much fun to be had by recycling stuff from the Goodwill. Warning...it is addictive once you start. You see possibilities EVERYWHERE!
Linen tank top and old lace blouse yoke.
This is how I will sew the lace to the tank. The narrow band at the top of the lace will be sewn down, but the lace below the band will be left loose. I think I will add crystals to the bottom of each lace point, to weight them down a bit, so they hang nicely.
Here are some closeups of the lace. I'm thinking of calling this the Gypsy Lace Tank. Sounds much more exotic and romantic than just Linen/Lace Tank Top.
And just for fun, here is a photo of my work table, which is in the garage, with both the Belle Epoch Short Dress, and the Linen/Lace Tank laid out, ready to start work on. Actually, I have already started on the Belle Epoch Short Dress, as the bottom of the shirt in the lower right has already been cut off. Please ignore the pile of couch throws waiting to be tossed in the washing machine. LOL
Monday, May 20, 2013
Next Project...Belle Epoque Inspired AC Short Dress
Okay, I have stated here many times (dozens, hundreds...) that I love vintage clothing, especially the Belle Epoch. There is a certain style of dress from that period that I especially love, and thought might be adaptable to modern wear, by incorporating it into the Alabama Chanin style, plus a technique I saw in Altered Couture where you add cotton shirt bottoms to knit tops. Put them all together, and I hope to get something unique and fun to wear.
Here is the inspiration.
The dress on the upper left is by Wendy Firmin, and pictured in the Feb/Mar/Apr issue of Altered Couture. She calls them Baby Doll dresses, as does AC of the dress pictured at the bottom (the one in gray is the one I am referring to in this project). I've already stated that anyone my age is not going to wear anything called "baby doll." I'd feel silly. The dress on the upper right is a costume from the Russian Ballet of that period, but is the same style as many of the dresses of that era. This is just the best example I could find this morning, but the style was used on everything from evening dresses to walking suits.
My idea is to make the top of the dress out of a T-shirt I bought at the Goodwill, as was the cotton man's shirt I will use for the bottom—actually, all the pieces for this came from the Goodwill (love that place!). My dress will have short sleeves and a higher neck than the AC dress. Also, I will not use lace over the seam, as Wendy did, but strips of another T-shirt, maybe done in the AC "random ruffle" design.
I am also experimenting in different color combinations. Dresses of the Belle Epoque period used colors we wouldn't think would go well together, but somehow work. There is a particular one that I love, in colors of acid purple, soft teal, with gold and black trim and beading. Kinda gives you an idea of how bold they were back then. So, here are the recycled T-shirts and man's shirt, laid out so you can see how it will work. All the banding will be out of the purple T-shirt. I will even put banding on the bottom of the cotton shirt, as I am going to cut the front to get the tapered look in the vintage dress, and I want the weight of the beaded banding to help keep the shirt hanging nicely.
The top T-shirt is a dark blueish gray. The banding T-shirt is a dark rich purple, and the cotton shirt is striped in narrow bands of blueish gray, but seem to have a purple cast to them when the shirt is seen as a whole. I tried putting various colors of T-shirts in the middle to see what would work, and this purple seemed the best.
I bought this shirt because I loved the detail on the front.
The lines of grey are stitched to make the ripple pattern, which I thought would lend itself very nicely to some kind of beading. This photo shows the front pattern, compared to the strait lines of the rest of the shirt. Also, I will either take a piece of the front—if I have enough after I cut the taper—or take one of the shirt sleeves, and make an applique to sew on the gray bodice, which will help tie everything together.
As with all these AC projects, it will be totally hand sewn. Now I just need to find the right color of embroidery floss and beads.
This is going to be a total experiment, which might end up a big flop, but one I thought would be fun to try. As with everything...time will tell.
Here is the inspiration.
The dress on the upper left is by Wendy Firmin, and pictured in the Feb/Mar/Apr issue of Altered Couture. She calls them Baby Doll dresses, as does AC of the dress pictured at the bottom (the one in gray is the one I am referring to in this project). I've already stated that anyone my age is not going to wear anything called "baby doll." I'd feel silly. The dress on the upper right is a costume from the Russian Ballet of that period, but is the same style as many of the dresses of that era. This is just the best example I could find this morning, but the style was used on everything from evening dresses to walking suits.
My idea is to make the top of the dress out of a T-shirt I bought at the Goodwill, as was the cotton man's shirt I will use for the bottom—actually, all the pieces for this came from the Goodwill (love that place!). My dress will have short sleeves and a higher neck than the AC dress. Also, I will not use lace over the seam, as Wendy did, but strips of another T-shirt, maybe done in the AC "random ruffle" design.
I am also experimenting in different color combinations. Dresses of the Belle Epoque period used colors we wouldn't think would go well together, but somehow work. There is a particular one that I love, in colors of acid purple, soft teal, with gold and black trim and beading. Kinda gives you an idea of how bold they were back then. So, here are the recycled T-shirts and man's shirt, laid out so you can see how it will work. All the banding will be out of the purple T-shirt. I will even put banding on the bottom of the cotton shirt, as I am going to cut the front to get the tapered look in the vintage dress, and I want the weight of the beaded banding to help keep the shirt hanging nicely.
The top T-shirt is a dark blueish gray. The banding T-shirt is a dark rich purple, and the cotton shirt is striped in narrow bands of blueish gray, but seem to have a purple cast to them when the shirt is seen as a whole. I tried putting various colors of T-shirts in the middle to see what would work, and this purple seemed the best.
I bought this shirt because I loved the detail on the front.
As with all these AC projects, it will be totally hand sewn. Now I just need to find the right color of embroidery floss and beads.
This is going to be a total experiment, which might end up a big flop, but one I thought would be fun to try. As with everything...time will tell.
Monday, April 8, 2013
ETT — A Few Process Photos & Comments
Okay, these are probably the last photos of the ETT I will post. I think it has arrived at that "enough is enough" point. LOL Here are a few process photos, and some explanations of why I did what I did, and what I would do differently.
So, this is what I started with. One teal-blue White Stag T-shirt, and a $2.99 Goodwill find baby doll dress that was too small for me.
This is the finished tunic (the sun came out long enough for me to get this photo!)
Right off, the first thing I would change is the bodice. It ended up too wide. I had left it on the wide side so I could wear the tunic over other T-shirts, but it ended up looking a bit too baggy, and needs tightening up for a better fit. Also, I am still debating whether to add some kind of design to the front. Now that I look at it, that is a pretty big expanse of blue. The reason I left it undecorated, is that I wear a lot of my own jewelry, and don't like it when the clothes and the jewelry fight each other for attention.
Here is the skirt, cut off of the baby doll dress yoke. I cut it above the seam that attached it to the yoke, mainly because I was afraid if I cut below the seam, the thing would stretch out and I would have to re-gather it up with straight stitches, which I didn't want to mess with if I didn't have to. As it turned out, the skirt ended up a bit smaller than the top of the tunic, so as I pinned it on, I had to stretch the seam, and in some places actually break the threads. Bottom line, it took a lot of futzing around to get the skirt on the tunic top. I sewed the skirt on to the tunic with a double row of chain stitch about an inch or so below the seam, then when finished, I VERY CAREFULLY cut the seam off.
The skirt pinned to the yoke of the tunic. As stated...lots of futzing to get it to fit. There are about two inches of blue tunic behind and below that pinned seam, which gave me lots of space to add the double row of chain stitch. Also I figured it would help keep the skirt hanging correctly, and help prevent the skirt from rolling under if there was only an inch or so of tunic behind the chain stitches.
And here is the finished skirt...attached with the double row of chain stitch, the old seam trimmed away, and then the chain stitch beaded. I also trimmed about three inches from the length of the skirt, as it hit right at my knees. I didn't want a dress, I wanted a tunic to wear with jeans.
And the final photo, showing the fit and length (the front and back are exactly the same, so even though you don't see the front of the piece, you're not missing anything...except me going without a bra. NOT pretty and NOT for posting on the internet!). It also shows how the tunic would fit better if the top part was adjusted to be not so wide. I think it would eliminate those loose fabric folds you can see, right above where the skirt attaches to the bodice.
Oh, only one last thing to add to the tunic. From now on I am putting my own clothing labels inside each piece. Just a small section of fabric with the same cartouche design using my initials that I use on my drawings and paintings, and then the year. For now I use a brown calligraphy-point Sharpi, but eventually I would like to make either a rubber stamp or a stencil for the label.
Now that this tunic is done, would I make another one? Yes, with a few adjustments. However, I will wear this one, as it is comfy and looks okay over T-shirts...and because I spent flipping FOREVER sewing on all those little beads! LOL
So, this is what I started with. One teal-blue White Stag T-shirt, and a $2.99 Goodwill find baby doll dress that was too small for me.
This is the finished tunic (the sun came out long enough for me to get this photo!)
Right off, the first thing I would change is the bodice. It ended up too wide. I had left it on the wide side so I could wear the tunic over other T-shirts, but it ended up looking a bit too baggy, and needs tightening up for a better fit. Also, I am still debating whether to add some kind of design to the front. Now that I look at it, that is a pretty big expanse of blue. The reason I left it undecorated, is that I wear a lot of my own jewelry, and don't like it when the clothes and the jewelry fight each other for attention.
Here is the skirt, cut off of the baby doll dress yoke. I cut it above the seam that attached it to the yoke, mainly because I was afraid if I cut below the seam, the thing would stretch out and I would have to re-gather it up with straight stitches, which I didn't want to mess with if I didn't have to. As it turned out, the skirt ended up a bit smaller than the top of the tunic, so as I pinned it on, I had to stretch the seam, and in some places actually break the threads. Bottom line, it took a lot of futzing around to get the skirt on the tunic top. I sewed the skirt on to the tunic with a double row of chain stitch about an inch or so below the seam, then when finished, I VERY CAREFULLY cut the seam off.
The skirt pinned to the yoke of the tunic. As stated...lots of futzing to get it to fit. There are about two inches of blue tunic behind and below that pinned seam, which gave me lots of space to add the double row of chain stitch. Also I figured it would help keep the skirt hanging correctly, and help prevent the skirt from rolling under if there was only an inch or so of tunic behind the chain stitches.
And here is the finished skirt...attached with the double row of chain stitch, the old seam trimmed away, and then the chain stitch beaded. I also trimmed about three inches from the length of the skirt, as it hit right at my knees. I didn't want a dress, I wanted a tunic to wear with jeans.
And the final photo, showing the fit and length (the front and back are exactly the same, so even though you don't see the front of the piece, you're not missing anything...except me going without a bra. NOT pretty and NOT for posting on the internet!). It also shows how the tunic would fit better if the top part was adjusted to be not so wide. I think it would eliminate those loose fabric folds you can see, right above where the skirt attaches to the bodice.
Oh, only one last thing to add to the tunic. From now on I am putting my own clothing labels inside each piece. Just a small section of fabric with the same cartouche design using my initials that I use on my drawings and paintings, and then the year. For now I use a brown calligraphy-point Sharpi, but eventually I would like to make either a rubber stamp or a stencil for the label.
Now that this tunic is done, would I make another one? Yes, with a few adjustments. However, I will wear this one, as it is comfy and looks okay over T-shirts...and because I spent flipping FOREVER sewing on all those little beads! LOL
Sunday, April 7, 2013
ETT — Finished
Here is the finished Empire Tank-Tunic. Mega apologies for the quality of the photos. It has been raining for days and days, and trying to take pictures inside my house is a big pain in the butt.Just not enough light.
So, here is the best I could do.
I only posted a back view to give an idea of the length and fit because....well, to be honest, before taking these photos I was already in sweats and done for the day, and was too lazy to put my bra back on. When I saw the front view shots, I went, "No fricken way am I posting those!" LOL This was taken out on our deck, and you can see it is still raining. I will post better front views later, but this is for Zom, who was wanting to see how this piece came out.
The skirt was sewn to the bodice with a double row of chain stitch. The bead colors are gun-metal gray and copper brown. I wanted to get away from always having the beads match the colors of the garment, and I took hints from some vintage clothing photos I saw on Pinterest. Only thing I would change on this piece, is I would make the bodice a bit smaller under the breasts. I left it a bit baggy, since I wanted to be able to wear shirts under it, like in the picture, but it's just a tad too wide and would look better tightened up.
So, that's it. The Empire Tank-Tunic. I will get better full length photos of the front of the piece when I can, and I have a few more "in process" photos that I would like to share as well.
And again, sincere apologies for the lousy light in the photos.
So, here is the best I could do.
I only posted a back view to give an idea of the length and fit because....well, to be honest, before taking these photos I was already in sweats and done for the day, and was too lazy to put my bra back on. When I saw the front view shots, I went, "No fricken way am I posting those!" LOL This was taken out on our deck, and you can see it is still raining. I will post better front views later, but this is for Zom, who was wanting to see how this piece came out.
The skirt was sewn to the bodice with a double row of chain stitch. The bead colors are gun-metal gray and copper brown. I wanted to get away from always having the beads match the colors of the garment, and I took hints from some vintage clothing photos I saw on Pinterest. Only thing I would change on this piece, is I would make the bodice a bit smaller under the breasts. I left it a bit baggy, since I wanted to be able to wear shirts under it, like in the picture, but it's just a tad too wide and would look better tightened up.
So, that's it. The Empire Tank-Tunic. I will get better full length photos of the front of the piece when I can, and I have a few more "in process" photos that I would like to share as well.
And again, sincere apologies for the lousy light in the photos.
Labels:
Alabama Chanin,
altered clothing,
beading,
embroidery,
Empire Tank Tunic,
T-Tunic
Wednesday, March 27, 2013
ETT — Update
After having put everything on hold for over a week while I recovered from The Crud, I have now gone back and done a bit of work on the Empire T-Tunic. I really like the color combination, and I have noticed that my embroidery stitching is getting better, and more uniform looking. Nice to know there is improvement there, as my hand stitching work is not all that great.
Here is the bodice cut out and sewn together. The necklace is one of mine, made from a vintage section of bracelet.
Here is the bodice with the black binding, sewn with embroidery thread. I picked a color of teal one shade lighter than the shirt, because I didn't think the dark teal would show up very well on the black. I think it was a wise decision, as the slightly lighter thread looks perfect.
Here is a close up of the stitching...and the necklace.
Next step is to add the black pleated skirt, and then to bead the binding. I don't think I'm going to put any applique or stenciling on the bodice. I kinda like it plain, and think the beading around the neckline, armholes, and where the skirt will be sewn on should be enough decoration for this piece.
Note: I have tried posting photos on the "Extra-Large" setting, but they bleed over into the blog sidebar and it looks sloppy. So, if you want to see a larger version of the photos, I'm afraid you'll have to click into each one. Sorry 'bout that.
Here is the bodice cut out and sewn together. The necklace is one of mine, made from a vintage section of bracelet.
Here is the bodice with the black binding, sewn with embroidery thread. I picked a color of teal one shade lighter than the shirt, because I didn't think the dark teal would show up very well on the black. I think it was a wise decision, as the slightly lighter thread looks perfect.
Here is a close up of the stitching...and the necklace.
Next step is to add the black pleated skirt, and then to bead the binding. I don't think I'm going to put any applique or stenciling on the bodice. I kinda like it plain, and think the beading around the neckline, armholes, and where the skirt will be sewn on should be enough decoration for this piece.
Note: I have tried posting photos on the "Extra-Large" setting, but they bleed over into the blog sidebar and it looks sloppy. So, if you want to see a larger version of the photos, I'm afraid you'll have to click into each one. Sorry 'bout that.
Labels:
Alabama Chanin,
altered clothing,
embroidery,
recycled T-shirts,
T-Tunic
Friday, March 15, 2013
The ETT — Empire Tank Tunic
In the Alabama Chanin Studio & Design book they refer to this design as a Babydoll Dress. At my age, I am not going to refer to anything I wear as being "babydoll." I'd feel silly. So, I am calling this next project the empire tank tunic (ETT). Empire = having an empire waist.
Caveat: I took these photos outside on the deck (you remember me saying previously that the inside of my house is like a cave in winter), so the sunlight has lightened the colors in the photos, especially the closeup of the pleats, which look gray. They aren't.
The teal blue T-shirt is one I bought years ago. I like the color, but the shirt is too short and too boxy. But it is a good, thick knit, so would make a good base for something.
The black-skirted mini-dress is a piece I found at the Goodwill for about $2.00. It is too small for me (tight across the back and under the arms), but I liked the pleated skirt part. I also wasn't too crazy about the pleats being above the bustline. As well as sewn in, the pleats are permanently ironed into the knit fabric, so that was new and different. Downside of this dress is that the knit is thin (you can see the sun shining through the yoke fabric in the closeup photo), and is one of those that collects lint and cat hair like a magnet. However, if sewn into a heavier yoke, I think the thin skirt will be okay. As for the lint and cat hair...well, I'm used to it.
For the binding color, I haven't decided yet. I have enough other black T-shirts to do black around the neckline and armholes, but I doubt I'll have enough of the teal blue to add to the black. I'd really like to have a strip of beaded blue on top of the pleated fabric just where it is sewn onto the blue yoke. If I don't, then I may opt for a third contrasting or complimentary color for all the binding.
What I hope to end up with is something like this, only longer...about mid-thigh. Blue on top, pleated black on the bottom. It will also be beaded. I want to be able to wear it over long-sleeved T-shirts, or with a bolero, for when the weather is cooler, or I know ahead of time I'm going to be trapped in a building with the AC running at sub-arctic temperatures.
Caveat: I took these photos outside on the deck (you remember me saying previously that the inside of my house is like a cave in winter), so the sunlight has lightened the colors in the photos, especially the closeup of the pleats, which look gray. They aren't.
The teal blue T-shirt is one I bought years ago. I like the color, but the shirt is too short and too boxy. But it is a good, thick knit, so would make a good base for something.
The black-skirted mini-dress is a piece I found at the Goodwill for about $2.00. It is too small for me (tight across the back and under the arms), but I liked the pleated skirt part. I also wasn't too crazy about the pleats being above the bustline. As well as sewn in, the pleats are permanently ironed into the knit fabric, so that was new and different. Downside of this dress is that the knit is thin (you can see the sun shining through the yoke fabric in the closeup photo), and is one of those that collects lint and cat hair like a magnet. However, if sewn into a heavier yoke, I think the thin skirt will be okay. As for the lint and cat hair...well, I'm used to it.
For the binding color, I haven't decided yet. I have enough other black T-shirts to do black around the neckline and armholes, but I doubt I'll have enough of the teal blue to add to the black. I'd really like to have a strip of beaded blue on top of the pleated fabric just where it is sewn onto the blue yoke. If I don't, then I may opt for a third contrasting or complimentary color for all the binding.
What I hope to end up with is something like this, only longer...about mid-thigh. Blue on top, pleated black on the bottom. It will also be beaded. I want to be able to wear it over long-sleeved T-shirts, or with a bolero, for when the weather is cooler, or I know ahead of time I'm going to be trapped in a building with the AC running at sub-arctic temperatures.
Subscribe to:
Posts (Atom)