"To live in the world without becoming aware of the meaning of the world is like wandering about in a great library without touching the books.".....The Secret Teachings of All Ages

"Neither aesthetics nor money-spent make a good studio-it's what you make inside it that really counts"...Shanna Van Maurice, artist.


Showing posts with label stencils. Show all posts

Thursday, May 28, 2020

While in Self-Isolation

I haven't talked about the Covid-19 pandemic and how it has affected not only my life, but the lives of others. I keep abreast of the latest scientific news, my husband (who works at an "essential" business) and I know what the risks are, and take precautions accordingly. And since both of us are in the "high risk" age group, we are cautious about talk of things opening up in our area. That being said, and with me being retired and pretty much an introvert, my lifestyle hasn't changed all that much. I try to concentrate on doing positive things, be it working in the garden, riding my horse, or raiding my stash of beads, jewelry findings, Goodwill T-shirts, stencils, art supplies, or writing. 

So between dragging a hose around to water the yard/garden, doing construction and painting of some Working Equitation obstacles for an upcoming WE clinic me and my partner are putting on June 6-7, and with outside temps rising into the 90s during the middle of the day, I have been retreating indoors and listening to Dr. Martin Shaw podcasts or his YouTube videos, and playing with jewelry making again. Last month I made a couple of necklaces at birthday gifts (see previous post), but  I wanted to do something a little more elaborate, again, using things I already had on hand. 

The first was this necklace, which I think has a very Renaissance flavor to it. I liked this necklace so much I intend to keep it, and that eventually when the artificial pearls start to lose their luster, I may remake it with real pearls. 


The one I just finished today is in a similar style, but made in a difference color scheme. The blue accent drops are from a vintage necklace picked up somewhere, that was broken, or missing pieces. I have had it for ages, so I don't really remember. 


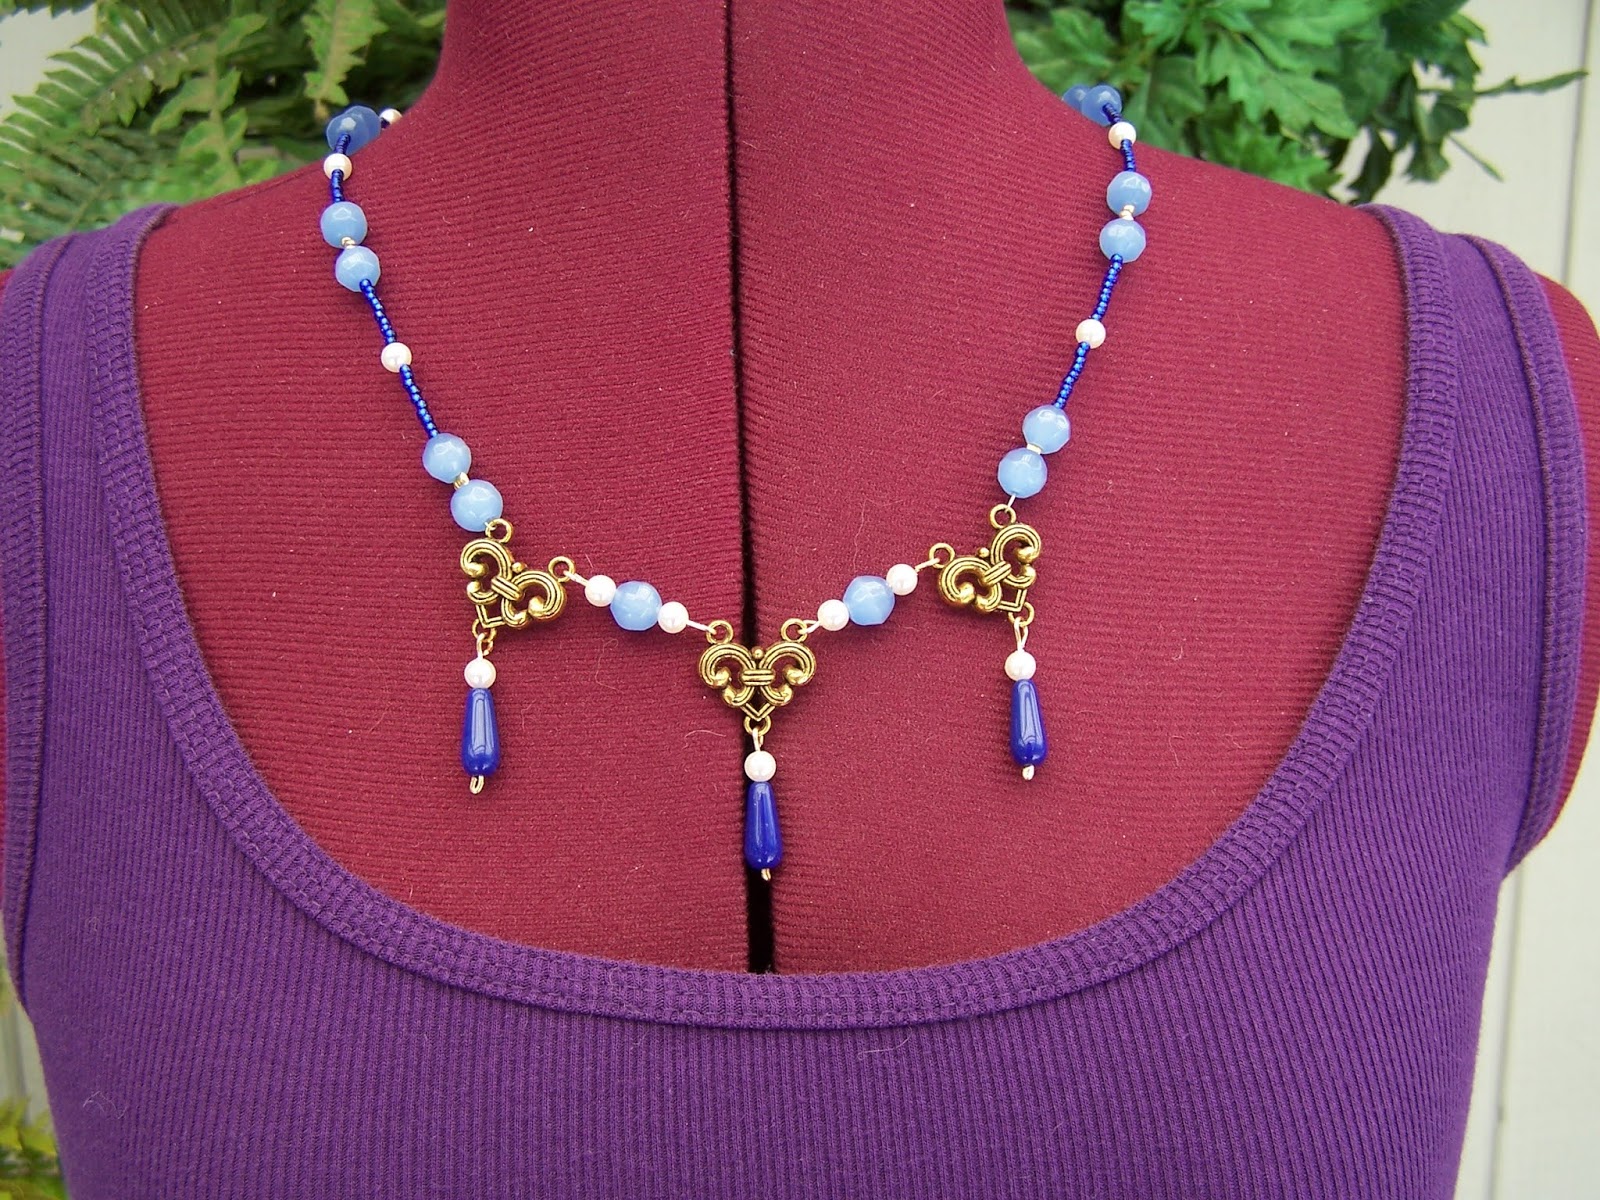
They were not intended to be worn together, but they do make quite the statement when they are!


For both of these necklaces I made simple matching earrings. 

I had a lot of fun getting back into making jewelry, so I am looking forward making more pieces using only what I already have handy. 

Something else on my radar as a possible future project is a sweater coat made with some of my stash of Goodwill T-shirts. My inspiration for this comes from an amazing lady named Katwise, who makes stunning, one-of-a-kind sweaters and coats out of the sweaters she collects from all over the country. Most of her things, as much as I love them, are too flamboyant for me. However, I starting wondering if I could do something similar, a bit less flamboyant, more conservative in color, with the material I get from cutting up men's XXL T-shirts. This afternoon I made a quick sketch, thinking about a simple, simple knee-length coat, just to test and play around with to see if it would even work. For starters I found an old McCalls pattern I had (number 4243) that would give me a boxy bodice easily split up the middle, to which I could add sleeves and a pieced full skirt.  I also considered that if it worked, I could stencil and bead parts of it, to tart it up a bit. 

This is the rough sketch, with a few notes. Once the Working Equitation clinic is over and I can clear off my big worktable out in the garage (now covered with paints, and misc. building supplies) I can start playing with fabric again. With the summer temperatures rising into the high 80s and 90s, this will be a fun project to do when working outside is not really an option.


This is how an introvert stays sane in these chaotic times. Hope you  all stay safe and find your own ways to keep positive. 

Thursday, January 14, 2016

Two Projects Finished

In December I had two projects that were sitting around half done. The T-shirt with beading over a stencil, and the red sweatshirt sitting out on the work table in the garage with soap lines drawn on it, but nothing more.

The beaded T-shirt I completed right before Christmas, and wore it to the family champagne brunch we always do at our place Christmas morning. This is my first time doing beaded backstitch over a stencil and I ended up really like the results.


The photos make the shirt look greenish, but it is a lovely turquoise. I enjoyed beading over the stencil so much, that I want to try it again. Also, I volunteered to teach a class in April on the technique of beaded backstitch using a stencil as a template. My first time teaching a class, so that should be interesting!

The second project was the red sweatshirt. I had originally intended to cut it up the front and make a jacket out of it. After thinking it over, and taking an inventory of jackets, shrugs, and boleros that I already owned, I decided to go a different way, so I rubbed out the soap marks. And because the weather has been dark, gloomy and rainy, I wanted something bright and cheerful. So, I cut the sleeves shorter, cut the banding off from the neckline and the bottom edge, and added T-shirt binding leftover from other projects. The shoulder decoration is also made from leftover bolero projects. All of it hand stitched.  I wanted this to be a little funky, a style I don't usually do, so left all the knots and tails of thread showing. When I finished the stitching, I added small brass washers I had purchased a long time ago in the hardware department at Home Depot (a great source if bits and bobs, the hardware section).

This sweatshirt was very wide, but once I cut off the bottom binding and shortened the sleeves, it worked really well over a long-sleeved T-shirt, which is what I had in mind.  I may, at some point, go back and add beads (I have some small, fiery red ones that would look great), but for now I am calling it done.


The above photo shows how the binding strips go over the shoulder seam, so when I wear it, the decoration will show on both the front and the back of the sweatshirt.


The bands were sewn length-wise with embroidery thread, then sewn across with a running stitch done with regular sewing thread, as were the brass washers.

This turned out to be a great way to use up T-shirt bindings, and short lengths of embroidery thread leftover from other projects, and it was fun to do something a little outside my usual box.

Oh, and both garments came from the Goodwill Store.


Tuesday, November 11, 2014

Medallion Sweatshirt Finished

I finished this project the other day and like the way it turned out. Not too shabby for a tarted up $3.99 Goodwill sweatshirt, doncha think? Yes, there are cat hairs on the shirt. In my house that is a given. What looks like areas of dirt, is the sun reflecting off the dust on my camera lens. Oops.


I really enjoy working with stencils and fabric paint, then adding the stitching and beads, so  I have plans for many more projects using all of those materials. Next is a kimono, and a over-tunic based on a 1920s beaded flapper dress.  I don't intend to bead the whole dress. Whew, that would be WAY too obsessive. I will post more about that project next time, but I did find a pattern to use, and as for the kimono, I have a pattern for that I bought back in the 70s.

While at JoAnns looking for a pattern, I also cruised the linen section. Sheesh! Cheapest linen fabric I could find, and that was on sale, was $9.99 a yard! The tunic needs 2 7/8th yards, if I make it full length (which I am not, but still...) How do people afford to sew anything these days? Unless you buy itty-bitty pieces for craft projects, it would cost you a fortune to make anything requiring over a yard of material.  I miss the old Fabric King in Southern California. During the late 70s and all during the 80s, I felt insulted if I had to pay over $2.50 a yard for anything. Trim was mostly 5 yrds for a dollar. I got all kinds of great stuff there on the cheap, which was nice, since I was doing a lot of costuming back then, making dresses that needed 7-10 yrds of material. Actually, I still have a few of those fabrics and trims.

Also, since we are bolting toward the holidays, JoAnns was a zoo of people buying craft stuff, and the cutting line was way too long for me to hang around.  I will probably wait until after Christmas...and the after-Christmas "I didn't like this" returns and "get rid of it" sales,  to get the tunic fabric.

Lastly, here is one more look at the scarab necklace.  A day or so ago, between rain sprinkles, the sun peeked out, so I took the necklace out on the deck to try and get a better photo. One that shows the colors. It was later in the afternoon, so there are some shadows, but the colors did show up nicely.


So, that's two projects finished, and two more in the planning stages. Seems there is always something fun to do, and now I actually have the time to do them. Sweet!

Wednesday, September 3, 2014

Looking Forward To Winter

Most of my friends reading that title would ask if I was feverish or delusional. I usually rant and rave about how much I hate winter and the months of rain and cold. This year things are a bit different, and it surprises even me that I am actually looking forward to winter this year. And since we don't have a covered arena, and our place turns to mud after the first rains, I don't have to feel too guilty about not getting outside and working...either in the yard or with our horses.

It's mainly due to the fact that this summer has been a busy one of horse events, or trailering the horses to the Rogue Mounted Archers site for practices. Then things really ramped up when the RMA decided to host an international competition Sept 9-14. As members of the group, we were driving back and forth (it's about an hour and fifteen minutes one way) to help get the property ready for this first time event. Also, things got even more antsy, for me, as I ended up deciding to compete. Since I had waffled back and forth over that decision — yes I will, no I won't, yes I will, no never mind — then had several friends tell me to just go for it, so I did...or will. Which put me in a tissy, because I had let things slide, thinking I was out of the competition and the pressure was off. Now it's back on.

Then, just two weeks after this BIG competition, Robert and I are involved in putting on the equestrian part of an SCA event Oct 3-5. We had hoped to kinda bail out of setting things up for this, but it turned out that we still needed to be involved, which just added to the stress level we were already under.

You can see why I am looking forward to winter. After that last event, I want to be a slug for a few weeks, then start some art/sewing projects that I just haven't had time for, as my limited brain power has been focused elsewhere.

Here are a few of the things I want to play around with...some new, some old friends.

Gelli printing. I had never heard of this form of mono-printing, but stumbled on an example on Pinterest. I then did a search of gelli printing on Pinterest and got tons of photos and how-tos showing what it was all about. It looks like fun, seems to be pretty easy, and you can do it on fabric as well as paper, just use fabric paint instead.

Using resin in jewelry making. This is another thing I have been wanting to play around with for quite a while. With the new kits available it seems an easy process and I have seen some really wonderful things done with resin.

More beading on fabric. I got really hooked on beading ever since I started doing the boleros. I want to try using stencils for beading designs, and incorporating paint, stitching and beading all together on pieces of clothing I pick up at the Goodwill. There are just so many wonderful beading ideas out there, and I get all excited. But I don't want to start anything until after all these events are over, so I can really hunker down and get busy.

Back to drawing and painting. I started drawing and using colored pencils a while back, but due to all the time spent trying to get ready for these upcoming events, I put it on the back-burner...again. I did buy a new and better sketchbook with paper than can stand up to wet media, so I am ready to go when everything else calms down.  I can also use this sketchbook as an art journal, which will be fun.

Here is a list of some other crazy things I would like to play around with during The Dark Days: Bleach pens, dying fabric, embroidery, making beaded bugs (I bought a little book on how to make them), and printing photos/artwork on cloth so I can use my own in designs on fabric.

Now you can see why I am looking forward to those long, cold, rainy months. I have a lot to do, and I can't wait to start playing.


Sunday, June 1, 2014

The Love of Stencils


Recently I have discovered many wonderful uses for stencils. Years ago I stenciled a pattern of twining leaves high on the walls of our dinning room, and I may have dinked around with a few since then, but nothing very exciting. Over the last two years or so, I have had all kinds of fun with them. The nice thing about stencils is, they are inexpensive, and can be found in all sorts of places. I picked up the variety you see above from JoAnn's fabrics, Michaels Crafts, Home Depot paint dept, and the rose I found at the Goodwill.

It started with seeing Rice's work over at the Voodoo Cafe. She used stencils to cut out patterns for the Alabama Chanin-type clothing she was making. So, not only did those posts inspire me to make some of the same types of clothing (and buying the AC book), doing all the stitching by hand, and getting back into embroidery, but it also got me using stencils in new ways.

The little amoeba-looking beaded star was my first attempt. I never used it on anything because the beads (only ones I had at the time) are heavy, so it's still in a drawer, waiting for a home. 


I started on cloth first, both for design and for stitching around, and for reverse appliques. I did three boleros, two tank tops, a T-shirt, and a sweatshirt. Here are three examples.


I have just started using them on paper for my artwork for background designs. My first try was on this color pencil and ink drawing of Nomad 2. Here is a close up of the stenciled part of of the background.


I drew around the stencil with a light pencil, then colored it in and added highlights. Worked great.

What's next? Well, once again, Rice has featured a new technique that I want to try, using stencils. You draw the stencil pattern on cloth, much as I did for the above drawing. Rather than use paint to color it in, you go over the drawing lines with stitching.  You end up with a lovely stitched pattern. Since I love the little boleros so much, and they are so easy to make, I want to try this way to use a stencil next. Rice used it on denim (or maybe it was linen, I can't remember), and it looks wonderful.

Just an FYI, if you have never visited Rice's blog site, I highly recommend it. She is always finding new ways to decorate fabric...she's now into dying her own embroidery thread...not to mention her other projects and trips to art conferences, photos of her cats, and just general fun everyday thoughts and, yes, sometimes a rant or two, but she's always inspiring.  Some of her posts will make you laugh out loud.


Saturday, June 23, 2012

Mistakes...They're A Good Thing!

I've been hearing a lot lately about letting yourself be free to make mistakes, because we always learn something from them. In some cases, for those of us with artistic proclivities, they can lead to a whole new fun way to play. Case in point: my attempts to stencil on T-shirt material.

My first attempt at putting a design on T-shirt material with fabric paint worked okay...sorta. The paint was a bit thick and as I dabbed it on with a makeup sponge, the fabric stuck to the sponge and pulled up through the stencil. It still worked, but I thought it would work better if I thinned the paint down with water.

With a new, larger stencil (found at my local home improvement center in the paint department), and some red pigment mixed with water, I tried again, and got...a blob of icky pink, in the vague outline of the stencil. The mixture was too thin, and the water bled under the stencil. And, alas, this blob was right on the front of my first tank top project. Wonderful, I thought, as I stared down at the nasty shade of pink. What the hell do I do now?


First, I let it dry. Then I thought, well, I'll just re-stencil the same design over the top of the blob, since most of it would be cut away anyway in a reverse applique. So, with a different color of paint (not my first choice on any of these colors, but I wanted to use stuff I already had during the experimentation process), I redid the stencil over the blob. To my surprise, I loved the halo effect the blob gave the pattern, but really hated the colors. Now I'm thinking of ways to purposely create the blob/halo before I put down the actual stencil design, using much nicer colors.


As for the final pink and white design...it got completely covered with a design that tied in better with the colors and design of the section of pet food logo that ended up on the top right of the shirt (I'm using old work T-shirts of my husband's, and most have pet food logos on them somewhere).

Even though the experiment with the watered down color failed completely, it actually gave me a new idea to play around with, so in the end, it wasn't really a failure, is was a mistake that led to new ideas. So, go ahead, make mistakes, and you, too, might create a big icky pink blob that leads to new ideas.